Articles by "Cool Widget For Social Sharing"
Showing posts with label Cool Widget For Social Sharing. Show all posts
Hacks,Tricks,Blogging Tricks ,Cool Computer Tricks ,Blogger Widget,Mobile Hack Tricks ,Auto like Trick,JavaScript,Coding,Magic Tricks,Facebook Tricks
Whatsapp Becames social Platform according to BUZZFEED SAYS "iPhone users are clicking their new WhatsApp button more than Twitter's. This was enough for us to build a WhatsApp sharing button generator, so you can easily create your own."

Searching For Whatsapp Button ? Here is something Special for you,Whatsapp Button ! Yes Whatsapp button for Blogger. This Is only Available only on HiteshKatara.com.want more widgets ? Click here . It is Useful for Sharing on Whatsapp 


Also Read : Top 10 Best Bollywood Movies Of 2014

  1. Go to Template > Edit HTML.
  2. Back up your template.
  3. Tick the Expand Widget Templates checkbox on top right of the code window.
  4. Next, locate the first instance of <data:post.body/> tag and paste the following code immediately above or Below it:

DEMO [Use Andriod or IOS Mobile and See on the top of Page ]
1)Small


 <!-- Whatsapp sharing button for blogger -->
 <!-- Copyrited Hiteshkatara.com do not edit this  -->
<script type='text/javascript'>if(typeof wabtn4fg===&quot;undefined&quot;){wabtn4fg=1;h=document.head||document.getElementsByTagName(&quot;head&quot;)[0],s=document.createElement(&quot;script&quot;);s.type=&quot;text/javascript&quot;;s.src=&quot;http://hiteshkatara.com/whatsappsharing/jquery.js&quot;;h.appendChild(s);}</script>
<a class='wa_btn wa_btn_s' expr:data-href='data:post.url' expr:data-text='data:post.title' href='whatsapp://send' style='display:none'>Share</a>
2)Medium


 <!-- Whatsapp sharing button for blogger -->
 <!-- Copyrited Hiteshkatara.com do not edit this  -->
<script type='text/javascript'>if(typeof wabtn4fg===&quot;undefined&quot;){wabtn4fg=1;h=document.head||document.getElementsByTagName(&quot;head&quot;)[0],s=document.createElement(&quot;script&quot;);s.type=&quot;text/javascript&quot;;s.src=&quot;http://hiteshkatara.com/whatsappsharing/jquery.js&quot;;h.appendChild(s);}</script>
<a class='wa_btn wa_btn_m' expr:data-href='data:post.url' expr:data-text='data:post.title' href='whatsapp://send' style='display:none'>Share</a>
3)Large


 <!-- Whatsapp sharing button for blogger -->
 <!-- Copyrited Hiteshkatara.com do not edit this  -->
<script type='text/javascript'>if(typeof wabtn4fg===&quot;undefined&quot;){wabtn4fg=1;h=document.head||document.getElementsByTagName(&quot;head&quot;)[0],s=document.createElement(&quot;script&quot;);s.type=&quot;text/javascript&quot;;s.src=&quot;http://hiteshkatara.com/whatsappsharing/jquery.js&quot;;h.appendChild(s);}</script>
<a class='wa_btn wa_btn_l' expr:data-href='data:post.url' expr:data-text='data:post.title' href='whatsapp://send' style='display:none'>Share</a>


5.Buttons positioning
6.To position the buttons at the bottom of post, place the code below (instead of above) <data:post.body/>.
Preview before saving.
Enjoy!

If You want to show this button only on Post use this code :
<b:if cond='data:blog.pageType == &quot;item&quot;'>
---whatsapp button code---
</b:if>


Note : "WhatsApp sharing is currently supported by iOS and Android. This button will figure out the current platform by itself and only shows up on supported devices!"
Source: www.hiteshkatara.com
Hacks,Tricks,Blogging Tricks ,Cool Computer Tricks ,Blogger Widget,Mobile Hack Tricks ,Auto like Trick,JavaScript,Coding,Magic Tricks,Facebook Tricks
Many Blogger site owners received the new Google+ Comment System pretty negatively because it forced all commenting users to create their own Google+ account before they were able to write a comment. The Google+ Comment System on Blogger was convenient to writers, but discouraged many users from continuing to comment on blogs because they simply didn't want to use Google+. For those that did use Google+ to make a comment, Blogger would never email you and notify you that someone left a comment; you could go days or weeks without ever realizing that you never responded to a reader.

In addition to frustrating your audience, the Google+ Comment System on Blogger depended upon the URL of your blog post. By changing your URLs or moving around your blog posts internally, you run the risk of losing every one of your comments that was placed using Google+.

Previously, the only way to solve this problem was to disable the comment system through your account settings, thus giving up your ability to use their Google+ account. Now, there's an easy new way to have the best of both worlds. Allowing fans of Google+ as well as everyday blog readers to access all same features, you’ll be able to engage every visitor equally. You can respond to comments while still being able to communicate with other Google+ users outside of your site and take advantage of the Google+ Comment System on Blogger.


How to Integrate Blogger and Google Plus Comments

To make the installation as simple as possible, I used inline jQuery and CSS, but who wants can change this code later. Also, the most accessible place I found to add it would be just after <b:include data='post' name='post'/>. So, let's start adding it:

Step 1. Log into your Blogger account and select your blog > go to 'Template' and press the 'Edit HTML' button on the right side.


Step 2. Click anywhere inside the code area and press CTRL + F keys to open the editor's search box and search for the following code:
<b:include data='post' name='post'/>
Step 3. Just after <b:include data='post' name='post'/> add the following code:
<b:if cond='data:blog.pageType == &quot;item&quot;'>
<style>#comments, #gplus-comments-visibility {display:none;} .comments-icons {background: url(https://blogger.googleusercontent.com/img/b/R29vZ2xl/AVvXsEh4C4o_MvnF0cLDwNkffkicYLgSugWMNy92fI_uEaoYw3HuC37nYsAb3YMHFSPB2W9XLBNPa0ZkVReCeiylXZN1AarVjDLC9WdBb0tiF1gDrbwBSZ8udyFTSIgC1x8o8diRbXv4ehj8qQgI/s1600/speech-bubble.png) no-repeat; font-size: 20px; font-family: &quot;Arial Narrow&quot;,Arial,sans-serif; color: #555; font-weight: bold; padding: 18px 15px 0; height: 70px; } .comments-icons a img {vertical-align: middle;}</style>
<div class='comments-icons'>
Show Comments: <a class='show-hide-comments' href='javascript:void();' onclick='$(&quot;#gplus-comments-visibility&quot;).slideToggle();$(&quot;#comments&quot;).hide();'><img class='gplus-icon' height='35' src='https://blogger.googleusercontent.com/img/b/R29vZ2xl/AVvXsEjagJu-qChRxOVfrKzPjUF-iLpn5ap2YpgDzL-eiwiomLv189sSMVqibnZAqCmOUReuWee0KwCQ4A8qyulyd7IDwjOL-yxlC8C-8rTaWprRsRusMGtoNxei81NsTgkT0uIuTyg7qhz4RyJL/s1600/google-plus-logo.png' width='35'/></a> OR <a class='show-hide-comments' href='javascript:void();' onclick='$(&quot;#comments&quot;).slideToggle();$(&quot;#gplus-comments-visibility&quot;).hide();'><img class='blogger-icon' height='35' src='https://blogger.googleusercontent.com/img/b/R29vZ2xl/AVvXsEi94mH2cM_W0FbYrPNkqXLiQ_qw5I9ApyaT6qx5_UTPc7I7QYgrCReQrDTJCJ7-bAyRTBEt1ps5xicnCtrIDZQH2Mrc5Vpi5bP9iuUTnXC07EBkHhgvn43nJNhTQ-3CIQ_KkdvAMJTQyBOS/s1600/blogger-logo.png' width='35'/></a>
</div>
<div id='gplus-comments-visibility'>
<div class='g-comments' data-first_party_property='BLOGGER' data-view_type='FILTERED_POSTMOD' data-width='550' expr:data-href='data:post.url'/>
</div>      
</b:if>
Note: The data-width is for setting the width of the comment box, so the number (550) indicated there can be changed according to the design of your blog.

Step 4. Press the "Save Template" button located at the top of the editor and view your blog to see if you have successfully added Google+ commenting system to Blogger.

Please note that in order to make this work, you need to make sure that you are using a version of jQuery in your site. Otherwise, add this line just above the </head> tag using the HTML template editor:
<script src='https://ajax.googleapis.com/ajax/libs/jquery/1.6.4/jquery.min.js' type='text/javascript'/>

That's it!

From here on out, any reader that views your post has the option of making a comment using their Google+ account, or the native Blogger comments. Your readers will enjoy the flexibility that your site provides and you will also benefit from the inclusive services offered by Google.
Hacks,Tricks,Blogging Tricks ,Cool Computer Tricks ,Blogger Widget,Mobile Hack Tricks ,Auto like Trick,JavaScript,Coding,Magic Tricks,Facebook Tricks
recent posts, blogger widgets

How to Add the Recent Posts Widget to Blogger

Step 1. From your Blogger Dashboard, go to Layout > click on Add a Gadget link


Step 2. From the pop-up window, scroll down and choose HTML/JavaScript


Step 3. Inside the empty box, add the following code:
<div class="eggTray">
<script src="https://google-api-141.googlecode.com/svn/recent.js">{"pipe_id":"1a6640e2a78b2c6e736f2220529daae5","_btype":"list",
"pipe_params":{"URL":"YOUR-BLOG/feeds/posts/default"},
"hideHeader":"false","height":"500","count": 8 }</script>
<noscript>Your browser does not support JavaScript!</noscript></div>
<style type=text/css>
.eggTray {margin:10px 0px;padding:0px;}
.ybr li  {border-bottom:0px #cccccc dotted; padding:0px 0px 10px 0px!important;}
.pipesTitle {padding-top:0px;}
.pipesDescription {display:true;}
.ycdr, .ycdr a {color:#999999;}
.widget .popular-posts ul {padding-left:0;}
</style>
Note: 
- Replace YOUR-BLOG with the url of your site/blog (ex: http://helperblogger.hiteshkatara.com) and pay attention to have no forward slash symbol "/" at the end of the url
- To disable the scroll bar, remove the number 500
- By default, this widget is set to display a maximum of 8 recent posts. To change this number, replace the number 8 with the number of posts that you want to appear
- if you want only the posts titles, change true to none and "0" from padding-top:0px with 10

Step 4. Save your widget. And you're done!
Hacks,Tricks,Blogging Tricks ,Cool Computer Tricks ,Blogger Widget,Mobile Hack Tricks ,Auto like Trick,JavaScript,Coding,Magic Tricks,Facebook Tricks
In my opinion, AddThis is the most complete social sharing service allowing to share your posts in more than 270 different social networks. I use the AddThis widget, so if you would like to see a live demo, please scroll down to the buttom of this post to see the AddThis sharing buttons.


This tutorial will show you how to register and add this feature on your blog and you will get to know some of the customization options of these buttons. So let's get started!

Getting the AddThis share buttons code

Step 1. Visit the https://www.addthis.com/get/sharing page.

Step 2. To get the sharing buttons and to access the AddThis sharing stats to find out how many people shared your post by using the AddThis feature, click on the "Create account" button.

create addthis account

The site will ask you to make a small registration. Fill out the information to register. It's quick, simple and it's free. To finish the registration, click on the Register button.

register addthis

Step 3. After you've been logged in, right below the "Get sharing buttons for", choose the "A website" option.

addthis share buttons

Step 4. In the "Select style" section, choose the buttons style that you think would look the best on your site/blog. Please note that on the right side you can see a preview of these buttons.

addthis sharing buttons

Step 5. After you have chosen the style, the site will provide a code - click on the "Grab it" button to copy it.

addthis code

The code provided will look like this:
<!-- AddThis Button BEGIN -->
<div class="addthis_toolbox addthis_default_style ">
<a class="addthis_button_facebook_like" fb:like:layout="button_count"></a>
<a class="addthis_button_tweet"></a>
<a class="addthis_button_pinterest_pinit" pi:pinit:layout="horizontal"></a>
<a class="addthis_counter addthis_pill_style"></a>
</div>
<script type="text/javascript">var addthis_config = {"data_track_addressbar":true};</script>
<script type="text/javascript" src="//s7.addthis.com/js/300/addthis_widget.js#pubid=ra-XXXXXXXXXXX"></script>
<!-- AddThis Button END -->

Now that you have selected and set up your AddThis sharing buttons, it is recommended to add them in the footer of your posts...

Adding the AddThis sharing buttons on Blogger

Step 1. Access your Blogger Dashboard and go to Template, then click on the Edit HTML button on the right:

blogger template

Step 2. Click anywhere inside the code area and press the CTRL + F keys to open the search box.

Step 3. Type the following line inside the search box and hit Enter to find it:
<div class='post-footer'> 
Step 4. Just above this line, add the code for the AddThis social sharing buttons.

Note: If you want to add at the beginning of your posts, add the code below the second <div class='post-header'>

Adding more buttons

To add more buttons, simply choose the button for that social network and add the code just above the </div> tag (see step 5 above).

Some examples:
<a class="addthis_button_linkedin"></a> /* linkedin button */
<a class="addthis_button_google_plusone" g:plusone:size="medium"></a> /*gplus button */
<a class="addthis_button_digg"></a> /* digg button */
<a class="addthis_button_stumbleupon"></a> /* stumbleupon button */
<a class="addthis_button_print"></a> /* print button */

CSS3 AddThis Share Buttons

You can add just a single button, so that when the reader hover over it, a menu will open with the options of social networks to share the post.

css3 share buttons, addthis

Visit this page for a demo.

Step 1. Go to Template > click on the Edit HTML button > press the CTRL + F keys and search for the <div class='post-footer'> line. Just above this line, paste the following code:
<style type='text/css'>
.addthis_share_btn a, .addthis_share_btn a:visited {
background: #FF5C00; /* background color of the button */
display: inline-block;
padding: 6px 12px;
font-family: arial,helvetica,lucida,verdana,sans-serif;
font-size: 12px;
line-height: 1em;
color: #fff;
text-decoration: none;
-moz-border-radius: 5px;
-webkit-border-radius: 5px;
-moz-box-shadow: 0 1px 3px rgba(0,0,0,0.5);
-webkit-box-shadow: 0 1px 3px rgba(0,0,0,0.5);
border-radius: 5px;
box-shadow: 0 1px 3px rgba(0,0,0,0.5);
text-shadow: 0 -1px 1px rgba(0,0,0,0.25);
border-bottom: 1px solid rgba(0,0,0,0.25);
position: relative;
cursor: pointer;
}
.addthis_share_btn a:hover {
background: #D45500; /* background color on mouse hover */
color: #fff;
}
.addthis_share_btn a:active { top: 1px; }

.addthis_share_btn a span, .addthis_share_btn:visited a span {
background: url(http://www.addthis.com/cms-content/images/gallery/icon-addthis.gif) no-repeat left;
padding: 1px 0 1px 18px;
}
</style>
<!-- AddThis Share Button -->
<div class='addthis_toolbox addthis_share_btn'>
<a class='addthis_button_compact' href='http://addthis.com/bookmark.php'>
<span>Share</span></a>
</div>
<script src='http://s7.addthis.com/js/250/addthis_widget.js' type='text/javascript'/>
<!-- End AddThis Share Button -->
Customization

- To change the color of the button according to the colors of your template, modify the color value in red.
- If you want to change the "Share" text, replace the text in blue.

Step 2. Save the changes by clicking on the Save template button and you're done!

Source :Helplogger.blogspot.com
Hacks,Tricks,Blogging Tricks ,Cool Computer Tricks ,Blogger Widget,Mobile Hack Tricks ,Auto like Trick,JavaScript,Coding,Magic Tricks,Facebook Tricks
This article is written to share a very simple trick with you to add Facebook pop up like box to your blog. It is aimed at increasing Facebook likes for your pages. It’s an astounding widget which, we are sure, will definitely work in third party blogger templaes as well. You must apply it on your page to have facebook likes for your pages
How to Add It to Your Blog?

Well, it’s very simple. The complete code to add it to your blog is shared as under. Just follow the following easy steps in order to install it on your blog.

1. Go to blogger Layout page

2. Add a Gadget >> Select HTML/JavaScript gadget

3. Paste below code inside that HTML/JavaScript gadget


Receive all updates via Facebook. Just Click the Like Button Below...


4. Save and drag the widget below the blog posts.
  • This widget will appear once in a month, by default, for a visitor who visits your blog. If you change the red coloured "true" value to "false" it will appear for each page refresh.
  • The lime coloured text will be displayed above the box in the pop up, and you may change it as you desire.
  • And lastly the red coloured text "allcoder.blogspot.in" is the user name of my Facebook page, so you must replace it with your FB page user name> You can do so just by visiting your Facebook page.
Now save the widget again and visit your blog to see the beautiful Facebook pop up like box.

Hopefully you will like this article same as our previous posts. We always give respect to our reputable readers by providing the latest and informative knowledge.
Hacks,Tricks,Blogging Tricks ,Cool Computer Tricks ,Blogger Widget,Mobile Hack Tricks ,Auto like Trick,JavaScript,Coding,Magic Tricks,Facebook Tricks

A colorful and trendy Subscription box 

A subscription box usually contains a dialog to attract your visitors to subscribe and Email form where visitors can submit their Email to receive update from your blog. a Blog without subscription form makes no sense. Subscribers make your Blog Success. The more readership you have the stronger you get. People subscribe to your Feeds only when you publish high quality and relevant content. The most important thing is positioning the subscribe form in near the top of the sidebar and below post.
Therefore to help you with your readership, I will help you creating a Beautiful subscribe box to attract your visitors ;)


Install it To Your Blogger


1. Go to Blogger > Design > Edit HTML 
2. Remember to backup your template  
3. Now Go to Layout > Add a Gadget > Select The HTML/Javascript
4. Paste This code:


<style>.btsubscribe1 {padding: 8px;background-color:#fa6121;background-position:center;background-size:100%;background-repeat:no-repeat;-webkit-transition: all 0.5s ease-in-out;-moz-transition: all 0.5s ease-in-out;-ms-transition: all 0.5s ease-in-out;-o-transition: all 0.5s ease-in-out;transition: all 0.5s ease-in-out;}
.btsubscribe2 {padding: 8px;padding-top:0px;background-color:#ffb739;background-position:center;background-size:100%;background-repeat:no-repeat;-webkit-transition: all 0.5s ease-in-out;-moz-transition: all 0.5s ease-in-out;-ms-transition: all 0.5s ease-in-out;-o-transition: all 0.5s ease-in-out;transition: all 0.5s ease-in-out;text-align:center;}
.buttonSubHomepage2 { height:24px; width:80px; border:solid; border-color:white; font-family:arial black; font-size:14px;  padding-bottom:21px; color:white; background-color:#ffb739; -webkit-border-top-left-radius: 0px;                 -webkit-border-top-right-radius: 0px;                 -webkit-border-bottom-right-radius: 25px;                 -webkit-border-bottom-left-radius: 25px;
                 -moz-border-radius-topleft: 0px;                 -moz-border-radius-topright: 0px;                 -moz-border-radius-bottomright: 25px;                 -moz-border-radius-bottomleft: 25px;
                 border-top-left-radius: 0px;                 border-top-right-radius: 0px;                 border-bottom-right-radius: 25px;                 border-bottom-left-radius: 25px; } .buttonSubHomepage2:hover { background-color:#EA9500; }</style><link href='http://fonts.googleapis.com/css?family=Oswald' rel='stylesheet' type='text/css' /><div class='btsubscribe1' align="center"><div style='color: #FFFFFF; font-weight: bold; font: 22px Oswald; margin: 0px 0px 10px 15px;'>Subscribe Now Free</div><div style='color: #FFFFFF; font-weight: bold; font: 16px Calibri, cursive; margin: 0px 0px 10px 15px;'>Enter your email to get <span style="color:#000000;"><u>FREE</u></span> Tips Daily.</div><div style='margin: 10px 0 0 6px;'><!--Subscription Box--><form action='http://feedburner.google.com/fb/a/mailverify' class='emailform'method='post' onsubmit='window.open(&apos;http://feedburner.google.com/fb/a/mailverify?uri=MyBlogtrick4u&apos;, &apos;popupwindow&apos;, &apos;scrollbars=yes,width=550,height=520&apos;);return true'style='margin: 0pt;' target='popupwindow'><input  name='uri' type='hidden' value='MyBlogtrick4u' /><input name='loc' type='hidden' value='en_US' /><input style="height:24px;width:200px;border:solid;border:hidden;border-radius:5px;font-size:12px;" class='btmailbox' name='email' onblur='if (this.value == &quot;&quot;) {this.value = &quot;Enter your email...&quot;;}'onfocus='if (this.value == &quot;Enter your email...&quot;) {this.value = &quot;&quot;}'type='text' value='Enter your email...' /><br/><input class="buttonSubHomepage2" alt='' title='' type='submit' value='Submit'/></form></div></div><div class="btsubscribe2"><div style='color: #FFFFFF; font-weight: bold; font: 22px Oswald; margin: 0px 0px 10px 15px;'>Follow us on</div><div style=''><!--Facebook URL--><a href='http://www.facebook.com/all-coder.blogspot.in' target='_blank' title='Join us on Facebook'><img src='http://3.bp.blogspot.com/-ChHaXU5VfIE/UJkIg5tptTI/AAAAAAAABEg/kzXjQ2QxEPo/s1600/facebook.png' alt='facebook'/></a><!--Twitter URL--><a href='http://twitter.com/hiteshkatara' rel='nofollow' target='_blank'title='Follow us on Twitter'><img src='http://3.bp.blogspot.com/-aG-POFOiBHc/UJkIkayVTGI/AAAAAAAABE4/hhun4Hjaudw/s1600/twitter.png' alt='twitter'/></a><!--Google+ URL--><a rel="publisher" href='https://plus.google.com/104444597478936840929' target='_blank'title='Follow us on Google+'><img src='http://2.bp.blogspot.com/-gxpckVUYzWI/UJkIh5kHQ5I/AAAAAAAABEo/IlR9Bt-FVBE/s1600/googleplus.png' alt='gplus'/></a><!--LinkedIn URL--><a href='http://in.linkedin.com/pub/Hiteshkatara' rel='nofollow' target='_blank'title='Follow us on LinkedIn'><img src='http://1.bp.blogspot.com/-c7m7fLXHewI/UJPaWsVTZ6I/AAAAAAAAA-M/uvdMMglb8fE/s1600/linkedin-circle-2.png' alt='linkedin'/></a><!--RSS URL--><a href='http://feeds.feedburner.com/MYblogtrick4u' rel='nofollow' target='_blank'title='Subscribe to RSS'><img src='http://4.bp.blogspot.com/-aN0dAN4mIno/UJkIje-dmSI/AAAAAAAABEw/gyK0zwpvjdE/s1600/rss.png' alt='rss'/></a><br/>
</div></div>


Customization:


  • You could edit the title highlighted in YELLOW text
  • To Edit the dialog box, Change the text highlighted in GREEN text
  • Replace the BLUE text with your Feedburner title.
We hoped your blog readership has increased :) If you have a trouble or having an issue with the customization, just use the comment form below ;)


Hacks,Tricks,Blogging Tricks ,Cool Computer Tricks ,Blogger Widget,Mobile Hack Tricks ,Auto like Trick,JavaScript,Coding,Magic Tricks,Facebook Tricks
Get More SubscribersIncrease email subscribers rate by 500% to get higher rankings for your blog. With email lists affiliate marketers can easily promote their products among their readers.Today in this post we will guide you how to add a popup Jquery Email subscription box to your blogger/blogspot blog. For the demo you might love to see this screenshot below:

How to Add Email Subscription Pop Up Box

  • Go to Blogger Dashboard » Template
  • Click On Edit HTML
  • Search For <body>
  • Copy/Paste the Following Code After/Below it
<link rel="stylesheet" href="https://googledrive.com/host/0B66hLK2d2x4VZTQ2eGdVTi13N1E" />
<style>
 /*-----------------------------------------------------------------------------------*/ 
/*Email Subscribe Box Popup By MyBlogTrick4u
/*-----------------------------------------------------------------------------------*/ 
#subscribe {
    font: 12px/1.2 Arial,Helvetica,san-serif;
    color: #666;
    height: 355px;
}
#subscribe a, 
#subscribe a:hover, 
#subscribe a:visited {
    text-decoration: none;
}
.box-title {
    color: #F66303;
    font-size: 20px !important;
    font-weight: bold;
    margin: 10px 0;
    border: 1px solid #ddd;
    -moz-border-radius: 6px;
    -webkit-border-radius: 6px;
    border-radius: 6px;
    box-shadow: 5px 5px 5px #CCCCCC;
    padding: 10px;
    line-height: 25px;
    font-family: arial !important;
}
.box-tagline {
    color: #999;
    margin: 0;
    text-align: center;
}
#subs-container {
    padding: 35px 0 30px 0;
    position: relative;
}
a:link, a:visited {
    border: none;
}
.demo {
    display: none;
</style>
<script src='http://ajax.googleapis.com/ajax/libs/jquery/1.5/jquery.min.js'></script> 
<script src="https://all-coder.googlecode.com/svn/jquery.colorbox.js"></script> 
 <script type="text/javascript">
jQuery(document).ready(function(){
if (document.cookie.indexOf('visited=true') == -1) {
var fifteenDays = 1000*60*60*24*7; /*This is line to edit time */
var expires = new Date((new Date()).valueOf() + fifteenDays);
document.cookie = "visited=true;expires=" + expires.toUTCString();
$.colorbox({width:"390px", inline:true, href:"#subscribe"});
}
});
</script>
<!-- This contains the hidden content for inline calls --> 

<div style='display:none'> 
<div id='subscribe' style='padding:10px; background:#fff;'> 
<style> .home-featured-right {
    background: url(http://demo.studiopress.com/balance/wp-content/themes/balance/images/dashes-bg.png) #d05353;
    border: 5px solid #fff;
    font-size: 16px;
    margin: 0px;
    width: 320px;
    font-family: calibri;
}
.home-featured-right,
.home-featured-right p,
.home-featured-right h4.widgettitle {
    color: #fff;
    text-shadow: #a64242 -1px -1px;
    text-align: center;
}
.home-featured-right p {
    font-size: 16px;
    margin-bottom: 20px;
}
.home-featured-right .widget {
    margin: 35px;
}
.home-featured-right h4.widgettitle {
    font-size: 26px;
    margin-bottom: 20px;
}
.home-featured-right input[type=text] {
    -moz-box-shadow: inset 0 1px 2px 1px #eee;
    -webkit-box-shadow: inset 0 1px 2px 1px #eee;
    background: #fff url(http://demo.studiopress.com/balance/wp-content/themes/balance/images/email-icon.png) no-repeat 16px 15px;
    border-bottom: none;
    border-left: 1px solid #963c3c;
    border-right: none;
    border-top: 1px solid #963c3c;
    box-shadow: inset 0 1px 1px 1px #eee;
    color: #000;
    font-family: Verdana, Arial, Tahoma, sans-serif;
    font-size: 12px;
    padding: 14px 15px 14px 45px;
    width: 180px;
}
#home-featured .home-featured-right input[type=submit] {
    background: url(http://demo.studiopress.com/balance/wp-content/themes/balance/images/email-button.png) no-repeat !important;
    border: none;
    font-size: 0;
    height: 28px;
    margin: 0 0 0 15px;
    line-height: 0;
    text-indent: -9999px;
    width: 26px;
}
#email-news-subscribe .email-box {
    padding: 5px 10px;
    font-family: "Arial","Helvetica",sans-serif;
    border-top: 0;
    border-image: initial;
    height: 35px;
    margin-left: -20;
}
#email-news-subscribe .email-box input.email {
    background: #FFFFFF;
    border: 1px solid #dedede;
    color: #999;
    padding: 7px 10px 8px 10px;
    -moz-border-radius: 3px;
    -webkit-border-radius: 3px;
    -o-border-radius: 3px;
    -ms-border-radius: 3px;
    -khtml-border-radius: 3px;
    border-radius: 3px;
    border-image: initial;
    font-family: "Arial","Helvetica",sans-serif;
}
#email-news-subscribe .email-box input.email:focus {
    color: #333
}
#email-news-subscribe .email-box input.subscribe {
    background: -moz-linear-gradient(center top,#FFCA00 0,#FF9B00 100%);
    background: -webkit-gradient(linear,left top,left bottom,color-stop(0,#FFCA00),color-stop(1,#FF9B00));
    background: -moz-linear-gradient(center top,#FFCA00 0,#FF9B00 100%);
    -pie-background: linear-gradient(270deg,#ffca00,#ff9b00);
    font-family: "Arial","Helvetica",sans-serif;
    border-radius: 3px;
    -moz-border-radius: 3px;
    -webkit-border-radius: 3px;
    border: 1px solid #cc7c00;
    color: white;
    text-shadow: #d08d00 1px 1px 0;
    padding: 7px 14px;
    margin-left: 3px;
    font-weight: bold;
    font-size: 12px;
    cursor: pointer;
    border-image: initial;
}
#email-news-subscribe .email-box input.subscribe:hover {
    background: #ff9b00;
    background-image: -moz-linear-gradient(top,#ffda4d,#ff9b00);
    background-image: -webkit-gradient(linear,left top,left bottom,from(#ffda4d),to(#ff9b00));
    filter: progid:DXImageTransform.Microsoft.Gradient(startColorStr=#ffffff,endColorStr=#ebebeb);
    outline: 0;
    -moz-box-shadow: 0 0 3px #999;
    -webkit-box-shadow: 0 0 3px #999;
    box-shadow: 0 0 3px #999 
        background:-webkit-gradient(linear,left top,left bottom,color-stop(0,#ffda4d),color-stop(1,#ff9b00));
    background: -moz-linear-gradient(center top,#ffda4d 0,#ff9b00 100%);
    -pie-background: linear-gradient(270deg,#ffda4d,#ff9b00);
    border-radius: 3px;
    -moz-border-radius: 3px;
    -webkit-border-radius: 3px;
    border: 1px solid #cc7c00;
    color: #FFFFFF;
    text-shadow: #d08d00 1px 1px 0
}   
</style>  
<div class="home-featured-right">
    <div id="enews-2" class="widget enews-widget">
        <div class="widget-wrap">
            <div class="enews">
                <h4 class="widgettitle">Sign Up for Free Email Updates</h4>
                <p>Get our latest updates direct in your inbox.Just enter your wail address
                    below....</p>
                <p>Your privacy and email address are safe with us!</p>
                <div id="email-news-subscribe">
                    <!-- Email Subscribe -->
                    <div class="email-box">
                        <form action="http://feedburner.google.com/fb/a/mailverify" method="post"
                        target="popupwindow" onsubmit="window.openundefined',http://feedburner.google.com/fb/a/mailverify?uri=MyBlogTrick4u" ><span style="background-color: #ea9999;">MBT4u</span>', 'popupwindow', 'scrollbars=yes,width=550,height=520');return true">
                            <input class="email" type="text" style="width: 150px; font-size: 12px;"
                            id="email" name="email" value="Enter Your Email here.." onfocus="if(this.value==this.defaultValue)this.value=&amp;#39;&amp;#39;;"
                            onblur="if(this.value==&amp;#39;&amp;#39;)this.value=this.defaultValue;" />
                            <input type="hidden" value="MyBlogTrick4U" name="uri" />
                            <input type="hidden" name="loc" value="en_US" />
                            <input class="subscribe" name="commit" type="submit" value="Subscribe"
                            />
                        </form>
                    </div>
                </div>
            </div>
        </div>
    </div>
</div>
<!-- end .home-featured-right -->
<div style="background: #fff;padding: 1px 8px 1px 3px;text-align: right;border-image: initial;font-size:10px;" > <!-- Don't remove the credit links,If you removed credits then your gagdet will not work --><span class="author-credit" style="font-family: Arial, Helvetica, sans-serif;"><a href="http://goo.gl/yAUBcq" target="_blank" >Blogger Widgets &#187;</a></span></div></div>
</div>

Customizations

Replace MybloggerTrick4u (Feedburner Username) with Your Own. Save your blogger template and its all done :)

We hope you liked this tutorial, and please tell us more about your reading experience in comments below. Stay Blessed :)
Hacks,Tricks,Blogging Tricks ,Cool Computer Tricks ,Blogger Widget,Mobile Hack Tricks ,Auto like Trick,JavaScript,Coding,Magic Tricks,Facebook Tricks
Hello Friends Today i am Sharing How To Increase Your Likes Through Website  It is Free Widget For All Users CONVERSIONS BOX Gives you A New Kind of Widget For Sites .Simply It is more Attractive to Increase Likes From site,Just Follow steps And You Are Done

GALLARY PICTURE SAYS


Steps


  1. Go to Website CONVERSIONS BOX 
  2. Enter Title (Must Be Short And Cool)
  3. Then Enter Your Site Or FB URL whisch you You want
  4. Click on GET CODE and You Are Done 


Hope You Fully Liked Please Comment If you Want Any Help ?
Hacks,Tricks,Blogging Tricks ,Cool Computer Tricks ,Blogger Widget,Mobile Hack Tricks ,Auto like Trick,JavaScript,Coding,Magic Tricks,Facebook Tricks
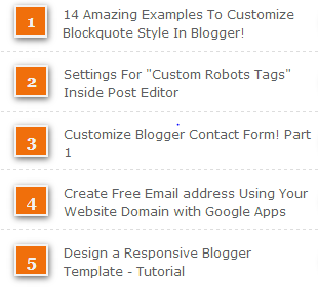
Popular post widgets are terribly very helpful for blogging. As a result, it attracts the visitors.By attracting the users the blog traffic are accrued. Today I'm here to share New Numbered Popular Post device for blogger. This device is makeup-ed with CSS3. Lets add this impact to blogger by following my straightforward instruction given bellow.

 Popular post widgets are terribly very helpful for blogging. As a result, it attracts the visitors. Recently, I added up New Attractive CSS Sliding Popular Posts Widget for Blogger.  By attracting the users the blog traffic are accrued. Today I'm here to share New Numbered Popular Post device for blogger. And this device was first employed by MyBloggerTricks. This device is makeup-ed with CSS3. Lets add this impact to blogger by following my straightforward instruction given bellow.     Also read this :  New Awe-Inspiring Related Post Widget for Blogger  While not the assistance of JavaScript this popular post widget was created. I already mentioned that popular posts plugins is a good tool to extend your blog's traffic further as page views. With the assistance of popular post widget you'll be able to get a lot of internal traffic for your blog. Adding Numbered Popular Posts Widget  First Go to Blogger >> Layout Hit "Add a Gadget" >> And Choose "Popular Posts"  In that new page you need to un-check the "image thumbnail" and also "snippet"  Choose your number of post to be published. Then Save it ! Then again Go To Blogger >> Template It is better to backup your template before making any changes in your blog. Then Hit "Edit HTML" Now search for </b:skin> by using shortcut keys. Once you finished searching it paste the following code given bellow just above </b:skin>  /*--- Numbered Popular Posts --- */  .popular-posts ul {  padding-left: 0px;  counter-reset: popcount;  } .popular-posts ul li:before {  list-style-type: none;  margin-right: 15px;  padding: 0.3em 0.6em;  counter-increment: popcount;  content: counter(popcount);  font-size: 16px;  background: #292D30;  color: #ffffff;  position: relative;  font-weight: bold;  font-family: georgia;  float: left;  border: 2px solid #dddddd;  box-shadow: 1px 2px 9px #666666; } .popular-posts ul li {  border-bottom: 1px dashed #dddddd;  } .popular-posts ul li:hover {  border-bottom: 1px dashed #696969;  } .popular-posts ul li a {  text-decoration:none; color:#5A5F63;  } .popular-posts ul li a:hover {  text-decoration:none;  } That's it ! Now Save your template Enjoy ! Still you get in Trouble ! Just comment Below we will fix your problems :)  Have a nice day ! Happy Blogging !


While not the assistance of JavaScript this popular post widget was created. I already mentioned that popular posts plugins is a good tool to extend your blog's traffic further as page views. With the assistance of popular post widget you'll be able to get a lot of internal traffic for your blog.

Adding Numbered Popular Posts Widget

  • First Go to Blogger >> Layout
  • Hit "Add a Gadget" >> And Choose "Popular Posts
  • In that new page you need to un-check the "image thumbnail" and also "snippet
  • Choose your number of post to be published.
  • Then Save it !
  • Then again Go To Blogger >> Template
  • It is better to backup your template before making any changes in your blog.
  • Then hit "Edit HTML"
  • Now search for </b:skin> by using shortcut keys.
  • Once you finished searching it paste the following code given bellow just above </b:skin>
/*--- Auto-Numbered Popular Posts --- */ .popular-posts ul {
padding-left: 0px;
counter-reset: popcount;
}
.popular-posts ul li:before {
list-style-type: none;
margin-right: 15px;
padding: 0.3em 0.6em;
counter-increment: popcount;
content: counter(popcount);
font-size: 16px;
background: #292D30;
color: #ffffff;
position: relative;
font-weight: bold;
font-family: georgia;
float: left;
border: 2px solid #dddddd;
box-shadow: 1px 2px 9px #666666; }
.popular-posts ul li {
border-bottom: 1px dashed #dddddd;
}
.popular-posts ul li:hover {
border-bottom: 1px dashed #696969;
}
.popular-posts ul li a {
text-decoration:none; color:#5A5F63;
}
.popular-posts ul li a:hover {
text-decoration:none;
}
  • That's it ! Now Save your template
  • Enjoy !
Still you get in Trouble ! Just comment Below we will fix your problems :) Have a nice day ! Happy Blogging !