Articles by "Blogger News"
Showing posts with label Blogger News. Show all posts
Hacks,Tricks,Blogging Tricks ,Cool Computer Tricks ,Blogger Widget,Mobile Hack Tricks ,Auto like Trick,JavaScript,Coding,Magic Tricks,Facebook Tricks

page peel for bloggerNetOopsblog protected image
You may saw this awesome trick used by many professional and other Websites/Blogs.This Page peel is used to Show ads ,this page peel attract Blog visitors and they may have the tendency to click on ad and your earnings increases.Also this page peel can be used to increase your Subscribers.Here I am going to show you how to add a page peel trick to Blogger blog.


Click the link below to view demo

Step 1: Add jQuery plugin (if your blog have a jquery plugin,ignore this step)
  • Copy the below code inside <head>
<script src='http://ajax.googleapis.com/ajax/libs/jquery/1.7.1/jquery.min.js' type='text/javascript'/>

Add Page Peel Effect To Blogger Blog 

Step 2 : 
  • Go to Design->Edit HTML
  • Copy and paste the below code above </head>
<style type='text/css'>
img { behavior: url(iepngfix.htc) }
#pageflip {
position: absolute;
right: 0; top: 0;
float: right;
}
#pageflip img {
width: 50px; height: 52px;
z-index: 99;
position: absolute;
right: 0; top: 0;
-ms-interpolation-mode: bicubic;
}
#pageflip .back-img {
width: 50px; height: 50px;
overflow: hidden;
position: absolute;
right: 0; top: 0;z-index:98;
background: url(https://blogger.googleusercontent.com/img/b/R29vZ2xl/AVvXsEgdKydxvdcb12xYIOjH3HNyG47dsv7-m38brK4MKRC72TBpOMVVCwsVe3ERjCLhf74b1pefH3E21njQIv03bipCgkdYKY0H0Ge5UhOR6z6VTll1fqdwUwEQ4COCFy-MkoPwwwAyZfx1K5M/s200/rss+netoops+blog+page+peel.png) no-repeat right top #fff;
}
</style><a href='http://netoopsblog.blogspot.com'><img src='https://blogger.googleusercontent.com/img/b/R29vZ2xl/AVvXsEj4Z_2ju5g9tSRrbScl_WdNXhbOMYaQhHO2FrbrOg8j5SocBIk9Ez-4HU8SlAAF1BgPVzrPHKPftMph-laUciVbsyiJ4OIOaVYqRU79dbyGwdUaSAs5ghZd0RsR7ZLjXggjNFwE8RCqOu0/s1600/1x1juice.png'/></a><script type='text/javascript'>
$(document).ready(function(){
//Page Flip on hover
$(&quot;#pageflip&quot;).hover(function() {
$(&quot;#pageflip img , .back-img&quot;).stop()
    .animate({
    width: &#39;307px&#39;,
    height: &#39;319px&#39;
    }, 500);
    } , function() {
    $(&quot;#pageflip img&quot;).stop()
    .animate({
    width: &#39;50px&#39;,
    height: &#39;52px&#39;
    }, 220);
$(&quot;.back-img&quot;).stop()
    .animate({
    width: &#39;50px&#39;,
    height: &#39;50px&#39;
    }, 200);
});
});
</script>
Step 3:
  • Copy the below code inside <body>  or  <body ...............>  
<div id='pageflip'>
<a href=' http://feeds.feedburner.com/HackingAndblogging '><img alt=' Hacking And Blogging' src='https://blogger.googleusercontent.com/img/b/R29vZ2xl/AVvXsEilc5gYis-FqhiKAZ8Cfc5C9xctP3uBElz17Cca8Dkv68YnHV84EYh7lFXg5DFJdx1HOq7uYEXCLv4HsdbjSIkB_3Dm4AVrbG7PgVVh95-ADYSHkcx7dlLGTReOb3lDrTJgSFquCgYC3JEK/s1600/page_flip.png'/></a>
<div class='back-img'/>
</div>
Change can the RED highlighted text with url image url that you want,else leave it default(needn't change)
Change the BLUE highlighted text with your feed URL or place your advertisement
  •  Save the Template 
You are done..! If any problem persists please do comment.
Hacks,Tricks,Blogging Tricks ,Cool Computer Tricks ,Blogger Widget,Mobile Hack Tricks ,Auto like Trick,JavaScript,Coding,Magic Tricks,Facebook Tricks

Why PageRank not increasing?
The actual PageRank is a link analysis algorithm introduced by Google in the year 1998 and it is mathematically rescaled by Google out 0f 100. This is the actual formula that tells Google which website has more importance and deserves to be ranked higher. The PageRank that is popular amongst bloggers and webmasters is the Google Toolbar PageRank which has always remained the hot topic in SEO forums and blogs. Of course most of you know that the Toolbar PageRank is a number between 0 and 10 which is based on the number of incoming links pointing to a site. It is updated mostly four times in a year. The most recent PageRank update was in November 8th 2011. Whenever I update readers about PageRank news many people rejoice on hearing the news while some get demotivated. So in today's post we will learn learn the technical reasons of why some Pages rank high with just few links while others still remain where they are despite several inbound links.

Is PageRank solely dependent on Incoming Links?

The answer is a straight no! It is true that PR is scaled on the number of dofollow links that point to your blog or site, but if that was the only source to achieve high PR then why does PageRank drop for some? and why do blogs with just few links rank higher than those with several incoming links? Google robots look carefully at three factors:
  • Significance of your incoming links
  • Balance of your Incoming and Outgoing links,
  • Use of your Current PageRank.
Lets discuss these three phrases one by one.

1. Significance Of Your Incoming Links

Google scans world Wide Web every fraction of second and crawls and indexes pages in its databases continuously. It looks for quality websites with good generated content and categorizes them separately from those forums, webs or blogs that publish poor content, old stories and violate copyrights. When sites with rich authority and sites with PR greater than 2 (i.e. PR>2) link to you, your blog starts attracting Google spiders and forces them to pay you proper respect because you have been recommended (linked) by a blog that has already won reputation in the eyes of Google for the past 4 months and above. So significance is actually referring to whether sites that link to you have some PR or not. The higher a site's PR the greater its significance. Can there be a difference in who is linking you? Yes there lies a big gap. Follow the table below,
Please Note: Assume that your site has a PR 0.0 and your blog starts receiving the following Links from one single site. I repeat the incoming links mentioned here are from one single site and not several. See how these links can effect your PR.
Note: The follow data is based on my experience so far and are mere but close assumptions.
Website's PageRankImpact
PR 0.050 and above links required to earn a PR1 or PR0.
PR 1.0About 5-10 links from this blog Can Earn you a PR 1.0
PR 2.0One Link can Earn you PR1
Greater than 5 Links Can earn you PR2
PR 3.0One Link can Earn you PR 1 or PR2
Greater than 5 Links Can earn you PR2
PR 4.0One link can earn you PR2
5 Links Will Earn you PR3
15 and above links will Earn you PR4
PR 5.0One Link can earn you PR2 or PR3,
Not sure about PR5 and PR6
PR 6.0One Link can earn you PR3
Two Links PR4
Not sure about PR5 and PR6
I have mentioned the impact of 15 links only for PR4 because this is what I have achieved so far and I really don't know the intensity of impact at higher PR's for such numbers of link density.
For the past one year I have been receiving Guest posts on my blog and I have observed how the number of posts from this blog benefitted the Guest Author. With this current PR update MBT guest Authors have received a PR1, PR2 and PR4 from a low PR stage. Hassam our Senior Guest Author managed to receive a PR 4.0 while initially at a PR 0.0 just by writing 25+ posts at MBT and still counting.
So if your fellow mate received a PageRank increase with just  one link and you could not with 20 or above links then check back to see if your incoming links are rich andsignificant. This is one reason why some rank high while others do not!

2. Balance Between Incoming and Outgoing links:

Make sure to link external sites only when needed. When you link external link , you are indirectly sharing your PR with that site. Linking low quality websites or linking Iframe pages etc often effects your PR. Of course your outgoing links will always be greater than your incoming links but keep the ratio between them as low as possible. This is indeed one of the best optimization strategies which is highly recommended.
If your incoming links are 100 and outgoing links are 10,000 then the chances of a PR drop is certain. One way of keeping external links low is to Tag them as nofollow. The nofollow tag will only allow your readers to visit that link but that link will not be crawled by Google robots.
Please read the following SEO based posts:
  • When should you link external links as nofollow?

3. Use of your Current PageRank

link sellingNow this phrase has a complete different meaning. This will answer the question that why your PageRank drops when you have done nothing wrong.
You loose your AdSense Account when you violate Google Terms of Services, similarly you loose your PageRank when you disobey the rules set by Google PageRank team. It is been clearly mentioned several times by Matt Cutts and other webmasterhelp members that PageRank should not be misused. Misusing means selling links on your website to link builders especially webhosting companies. Selling links is equal to recommending a website to Google just for the sake of money and not because of quality content. When you receive a PR 3 or above, many linkbuilders will contact and pay you to add their link to one of your high ranked post. They will pay you as high as $200 per link for one year or all time. Money is something that no one can resist thus they commit this crime and upon next crawl of your page, Google detects that a new irrelevant link has been added to your post which was previously not present and then the robot scans other pages of your blog and finally comes to a conclusion "Link Sell Detected!"  Thus on next update you loose your hard earned PR. Please do not worry about revenue, give more value to readership and social rank. Revenue will naturally follow up.

Conclusion:

Do not worry about PageRank as you should be about Alexa Rank and your Social rankings. Give more value to your readership. Work hard to increase the number of your daily subscribers and pay less attention to revenue for the first year of your blogging career. Everything will play just fine on your behalf naturally when you set long term goals instead of wrong short cuts. I hope this little info proves helpful in clarifying the technical reasons behind PageRank drop and rise. Wish to see you all rejoicing on next PageRank update probably on February 2012. Peace and blessings brothers. :)
Hacks,Tricks,Blogging Tricks ,Cool Computer Tricks ,Blogger Widget,Mobile Hack Tricks ,Auto like Trick,JavaScript,Coding,Magic Tricks,Facebook Tricks


Touch Me Sharing WidgetThe rapid advancement and development of Social Media and growing interest of people in social networking sites has given birth to dozens of social sharing tools and services. Web masters are getting addicted to these tools because unlike organic traffic from search engines, web traffic from social channels have overtaken search traffic. Bloggers today depend largely on networks like Facebook, Google plus and twitter to drive traffic to their blogs. These tools are good only if they can attract a visitor to bookmark and share your content. From your website quality content till your blog design, every single bit counts in turning a visitor into a follower. To help you with your dream of increasing  fans and readers we bring you "Touch Me". Its named such due to its appealing look that forces a visitor to roll hover the cursor over the icons and hit follow! :) This gadget is neatly structured using buttons from popular services like Google Plus, Facebook, Twitter and RSS. We have coded it neatly using basic HTML and some spicy CSS styles.


Previous Version

Social Sharing Button With Hover Effect V1


Please take less than a minute to like and bookmark this page as a token of favor for our small effort. :)

Where should you add it?

Its is standard practice to add social counters inside posts and social sharing buttons in a sidebar. I would therefore advise that you add this widget towards the top right section of your blog above all ads and gadgets.

Add it to blogger

I am sharing below the steps for BlogSpot users. If you are a wordpress or Joomla user or running a normal website then you just need to copy and paste the following code inside your templates.
Following are the steps for blogger users
  1. Go To Blogger > Layout
  2. Choose add a gadget
  3. Select HTML/JavaScript
  4. Paste the following code inside it, 

<style>
/*--------Touch Me Sharing Widget ------*/
.touchme a {
display:block;
height:50px;
width:50px;
padding:0 4px;
float:left;
background:transparent url(http://mybloggertricks.googlecode.com/files/Sharing%20Touch%20Me.png) no-repeat;
-webkit-transition: ease-in 0.2s all;
-moz-transition: ease-in 0.2s all;
-o-transition: ease-in 0.2s all;
-ms-transition: ease-in 0.2s all;
transition: ease-in 0.2s all;
cursor:pointer;
}

.touchme a.googleplus {
background-position: 0px -58px;
}
.touchme a.googleplus:hover {
background-position: 0px 0px;
}

.touchme a.twitter {
background-position: 0px -290px;
}
.touchme a.twitter:hover {
background-position: 0px -232px;
}
.touchme a.facebook {
background-position: 0px -406px;
}
.touchme a.facebook:hover {
background-position: 0px -348px;
}

.touchme a.rss {
background-position: 0px -174px;
}
.touchme a.rss:hover {
background-position: 0px -116px;
}

</style>

<div class='touchme'>
<!--RSS-->
<a class='rss' href="YOUR RSS LINK" rel='external nofollow' target='_blank'></a>
<!--Google Plus-->
<a class='googleplus' href="YOUR GOOGLE PROFILE LINK" rel='external nofollow' target='_blank'></a>
<!--Facebook-->
<a class='facebook' href="YOUR FACEBOOK LINK" rel='external nofollow' target='_blank'></a>
<!-- Twitter -->
<a class='twitter' href="YOUR TWITTER LINK" rel='external nofollow' target='_blank' ></a>

</div>

Please fill these requirements:
  • Replace YOUR RSS LINK with your Feed burner link.
  • Replace YOUR GOOGLE PROFILE LINK with your Google+ URL
  • Replace YOUR FACEBOOK LINK with your Facebook URL
  • Replace YOUR TWITTER LINK with your Twitter Profile URL
         5. Hit save and you are all done!
Visit your blog to see it working just perfectly. Move your cursor over the icons and enjoy playing!
Hacks,Tricks,Blogging Tricks ,Cool Computer Tricks ,Blogger Widget,Mobile Hack Tricks ,Auto like Trick,JavaScript,Coding,Magic Tricks,Facebook Tricks

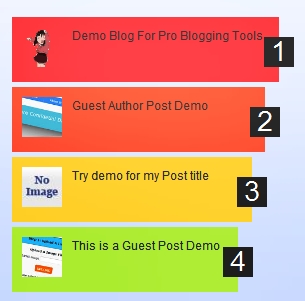
Multi Colored Popular Post Widget For BloggerAfter a short break, I have come with a awesome Multicolored Popular Post widget just similar to WordPress Popular Post Widget. You have seen this widget in Many WordPress Blog and Its not a Free Widget. In last days I was busy with this widget and Finally make this for Blogger Blog Free of Cost. I tried my level best to give the look same as WordPress Popular Post Widget. . It really attract Visitor to visit your popular posts. This Poplar Post widget have three options just similar in Default Popular Post Widget of Blogger. Here i will tell you every steps one by one and I made it very simple, to add this widget in any blogger blog.


Various Options in this Popular Post Widget


  • Display Only Title of The post
  • Display Title with Post Image Thumbnail and
  •  Display Title along with Post Snippets.
Adding this widget in your is very Simple, Just Follows the Simple Steps.


Note: Before Adding this Widget in Blog, Please Remove the Default Popular Post Widget From your Blog, If you are using otherwise Go to steps.


Steps to Add Multicolored Popular Post Widget


  1. Go to Blogger > Design > Edit HTML
  2. Backup Your Template
  3. Expand the Widget Template
  4. Search For this Code 
 /* Variable definitions
paste the Following Code Just below it.

<Group description="PopularPosts Backgrounds" selector="#PopularPosts1">
<Variable name="PopularPosts.background.color1"
description="background color1" type="color" default="#fa4242"
value="#ff4c54"/>
<Variable name="PopularPosts.background.color2"
description="background color2" type="color" default="#ee6107"
value="#ff764c"/>
<Variable name="PopularPosts.background.color3"
description="background color3" type="color" default="#f0f"
value="#ffde4c"/>
<Variable name="PopularPosts.background.color4"
description="background color4" type="color" default="#ff0"
value="#c7f25f"/>
<Variable name="PopularPosts.background.color5"
description="background color5" type="color" default="#0ff"
value="#33c9f7"/>
<Variable name="PopularPosts.background.color6"
description="background color6" type="color" default="#ff0"
value="#7ee3c7"/>
<Variable name="PopularPosts.background.color7"
description="background color7" type="color" default="#ff0"
value="#f6993d"/>
</Group>

 5. Now, Search  ]]></b:skin>


Paste the Following Code just above it.


#PopularPosts1 ul{margin:0;padding:5px 0;list-style-type:none}
#PopularPosts1 ul li{position:relative;margin:5px 0;border:0;padding:10px}
#PopularPosts1 ul li:first-child{background:$(PopularPosts.background.color1);width:90%}
#PopularPosts1 ul li:first-child:after{content:"1"}
#PopularPosts1 ul li:first-child + li{background:$(PopularPosts.background.color2);width:85%}
#PopularPosts1 ul li:first-child + li:after{content:"2"}
#PopularPosts1 ul li:first-child + li + li{background:$(PopularPosts.background.color3);width:80%}
#PopularPosts1 ul li:first-child + li + li:after{content:"3"}
#PopularPosts1 ul li:first-child + li + li + li{background:$(PopularPosts.background.color4);width:75%}
#PopularPosts1 ul li:first-child + li + li + li:after{content:"4"}
#PopularPosts1 ul li:first-child + li + li + li + li{background:$(PopularPosts.background.color5);width:70%}
#PopularPosts1 ul li:first-child + li + li + li + li:after{content:"5"}
#PopularPosts1 ul li:first-child + li + li + li + li +li{background:$(PopularPosts.background.color6);width:65%}
#PopularPosts1 ul li:first-child + li + li + li + li + li:after{content:"6"}
#PopularPosts1 ul li:first-child + li + li + li + li + li +li{background:$(PopularPosts.background.color7);width:60%}
#PopularPosts1 ul li:first-child + li + li + li + li + li + li:after{content:"7"}
#PopularPosts1 ul li:first-child:after,
#PopularPosts1 ul li:first-child + li:after,
#PopularPosts1 ul li:first-child + li + li:after,
#PopularPosts1 ul li:first-child + li + li + li:after,
#PopularPosts1 ul li:first-child + li + li + li + li:after,
#PopularPosts1 ul li:first-child + li + li + li + li + li:after,
#PopularPosts1 ul li:first-child + li + li + li + li + li + li:after{position:absolute;top:20px;right:-15px;border-radius:50%;background:#353535;width:30px;height:30px;line-height:1em;text-align:center;font-size:28px;color:#fff}#Probloggingtools{}
#PopularPosts1 ul li .item-thumbnail{float:left;border:0;margin-right:10px;background:transparent;padding:0;width:40px;height:40px}
#PopularPosts1 ul li a{font-size:12px;color:#444;text-decoration:none}
#PopularPosts1 ul li a:hover{color:#222;text-decoration:none}
 6. You have almost done.  Now Search For the Following code or Just Similar to this


<b:section class='sidebar' id='sidebar'> 


Paste the Following Code Just Below it.


<b:widget id='PopularPosts1' locked='false' title='Popular Posts' type='PopularPosts'>
<b:includable id='main'>
<b:if cond='data:title'>
<h2><data:title/></h2>
</b:if>
<div class='widget-content popular-posts'>
<ul>
<b:loop values='data:posts' var='post'>
<li><b:if cond='data:showThumbnails == &quot;false&quot;'>
<b:if cond='data:showSnippets == &quot;false&quot;'>
<a expr:href='data:post.href' expr:title='data:post.title' rel='bookmark'><data:post.title/></a>
<b:else/>
<a expr:href='data:post.href' expr:title='data:post.snippet' rel='bookmark'><data:post.title/></a>
        </b:if>
       <b:else/>
        <b:if cond='data:showSnippets == &quot;false&quot;'>
         <b:if cond='data:post.thumbnail'>
          <img class='item-thumbnail' expr:alt='data:post.title' expr:src='data:post.thumbnail'/>
         <b:else/>
          <img alt='no image' class='item-thumbnail'
src='https://blogger.googleusercontent.com/img/b/R29vZ2xl/AVvXsEi6CSUIqXf8Ime8r4kg17WkqRtQTtJCEXirulD4Ry6YbQyIPVkFADB7jkxpxeY9Y7sE9emdDyh2Wa4APg0fN_3i0HQsrHfgDhyGE2xjtFMcqkaF4ylKSDUjZn2IeOmR7b1Etrf3jccf3MY/s1600/defaultimage.jpg'/>
         </b:if>
         <a expr:href='data:post.href' expr:title='data:post.title' rel='bookmark'><data:post.title/></a>
         <div class='clear'/>
        <b:else/>
         <b:if cond='data:post.thumbnail'>
          <img class='item-thumbnail' expr:alt='data:post.title' expr:src='data:post.thumbnail'/>
         <b:else/>
          <img alt='no image' class='item-thumbnail'
src='https://blogger.googleusercontent.com/img/b/R29vZ2xl/AVvXsEi6CSUIqXf8Ime8r4kg17WkqRtQTtJCEXirulD4Ry6YbQyIPVkFADB7jkxpxeY9Y7sE9emdDyh2Wa4APg0fN_3i0HQsrHfgDhyGE2xjtFMcqkaF4ylKSDUjZn2IeOmR7b1Etrf3jccf3MY/s1600/defaultimage.jpg'/>
         </b:if>
         <a expr:href='data:post.href' expr:title='data:post.snippet' rel='bookmark'><data:post.title/></a>
         <div class='clear'/>
        </b:if>
       </b:if>
      </li>
     </b:loop>
    </ul>
   </div>
  </b:includable>
</b:widget>  


   7. Done! Save your Template and Visit your Blog to See This Awesome Popular Post Widget


Hacks,Tricks,Blogging Tricks ,Cool Computer Tricks ,Blogger Widget,Mobile Hack Tricks ,Auto like Trick,JavaScript,Coding,Magic Tricks,Facebook Tricks

Hii..Guys Wassup ! Here I M Posting NEW Widget For Blogger As I Posted Previous Of  Mouse Hover Now Im Posting New With More Social Sharing It Will Help You For Make Your Blog More Usefull And It Get Flooded Your Blog


How To Add Updated Mashable Style Widget To Blogger?

1.Copy his below Code 


<style>/* Social Widget */    #HB-mashable-bar{border: 0;margin-bottom: 10px;margin: 0 auto;width:300px;border: 1px solid #DDD;}.fb-likebox{background: #fff;padding: 10px 13px 0 10px;border-right: 1px solid #D8E6EB;border-left: 1px solid #D8E6EB;border-bottom: 1px solid #D8E6EB;margin:0px;height:70px;}.googleplus{background: #F5FCFE;border-top: 1px solid #FFF;border-bottom: 1px solid #ebebeb;border-right: 1px solid #D8E6EB;border-left: 1px solid #D8E6EB;border-image: initial;font-size: .90em;font-family:"Arial", "Helvetica", sans-serif;color: #000;padding: 9px 11px;line-height: 1px;}.googleplus span{color: #000;font-size: 14px;position: absolute;display:inline-block;margin: 9px 70px;font-family: calibri;width: 280px;}.pinterest1{background: #F5FCFE;border-top: 1px solid #FFF;border-bottom: 1px solid #ebebeb;border-right: 1px solid #D8E6EB;border-left: 1px solid #D8E6EB;border-image: initial;font-size: .90em;font-family:"Arial", "Helvetica", sans-serif;color: #000;padding: 9px 11px;line-height: 1px;}.pinterest1 span{color: #000;font-size: 14px;position: absolute;display:inline-block;margin: 9px 40px;font-family: calibri;width: 280px;}.g-plusone{float: left;}.gplus{background: #fff;padding: 0px;border: 0px solid #C7DBE2;margin-bottom:-13px;}.twitter{background: #EEF9FD;padding: 10px;border: 1px solid #C7DBE2;border-top: 0;}.pterest{background: #F5FCFE;padding: 10px;border: 1px solid #C7DBE2;border-top: 0;}#mashable{background: #EBEBEB;border: 1px solid #CCC;border-top: 1px solid white;padding: 2px 8px 2px 3px;text-align: right;border-image: initial;}#mashable .author-credit{}#mashable .author-credit a{font-size: 10px;font-weight: bold;text-shadow: 1px 1px white;color: #1E598E;text-decoration:none;}#email-news-subscribe .email-box{padding: 5px 10px;font-family:"Arial", "Helvetica", sans-serif;border-top: 0;border-right: 1px solid #C7DBE2;border-left: 1px solid #C7DBE2;border-image: initial;height:36px;}#email-news-subscribe .email-box input.email{background:#FFFFFF;border: 1px solid #dedede;color: #999;padding: 7px 10px 8px 10px;-moz-border-radius: 3px;-webkit-border-radius: 3px;-o-border-radius: 3px;-ms-border-radius: 3px;-khtml-border-radius: 3px;border-radius: 3px;border-image: initial;font-family:"Arial", "Helvetica", sans-serif;}#email-news-subscribe .email-box input.email:focus{color:#333    }#email-news-subscribe .email-box input.subscribe{background: -moz-linear-gradient(center top, #FFCA00 0, #FF9B00 100%);background: -webkit-gradient(linear, left top, left bottom, color-stop(0, #FFCA00), color-stop(1, #FF9B00));background: -moz-linear-gradient(center top, #FFCA00 0, #FF9B00 100%);-pie-background: linear-gradient(270deg, #ffca00, #ff9b00);font-family:"Arial", "Helvetica", sans-serif;border-radius:3px;-moz-border-radius:3px;-webkit-border-radius:3px;border:1px solid #cc7c00;color:white;text-shadow:#d08d00 1px 1px 0;padding:7px 14px;margin-left:3px;font-weight:bold;font-size:12px;cursor:pointer;border-image: initial;}#email-news-subscribe .email-box input.subscribe:hover{background: #ff9b00;background-image:-moz-linear-gradient(top, #ffda4d, #ff9b00);background-image:-webkit-gradient(linear, left top, left bottom, from(#ffda4d), to(#ff9b00));filter:progid:DXImageTransform.Microsoft.Gradient(startColorStr=#ffffff, endColorStr=#ebebeb);outline:0;-moz-box-shadow:0 0 3px #999;-webkit-box-shadow:0 0 3px #999;box-shadow:0 0 3px #999 background:-webkit-gradient(linear, left top, left bottom, color-stop(0, #ffda4d), color-stop(1, #ff9b00));background:-moz-linear-gradient(center top, #ffda4d 0, #ff9b00 100%);-pie-background:linear-gradient(270deg, #ffda4d, #ff9b00);border-radius:3px;-moz-border-radius:3px;-webkit-border-radius:3px;border:1px solid #cc7c00;color:#FFFFFF;text-shadow:#d08d00 1px 1px 0    }#other-social-bar{background-color: #D8E6EB;box-shadow: 0 1px 1px #FFFFFF inset;padding: 0px;font-family:"Arial", "Helvetica", sans-serif;font-weight:bold;overflow: hidden;border: 1px solid #B6D0DA;height:37px;}#other-social-bar ul{list-style: none outside none;padding-left: 4px;}#other-social-bar .other-follow{float: left;color:#1E598E;overflow: hidden;height:20px;padding:5px;width: 270px;}#other-social-bar .other-follow ul{list-style: none outside none;padding-left: 4px;}#other-social-bar .other-follow ul li{font-size: 12px;font-weight: bold;display:inline;border:0;text-shadow: 1px 1px white;}#other-social-bar .other-follow ul li a{font-size: 12px;color:#1E598E;font-weight: bold;display:inline;text-shadow: 1px 1px white;}#other-social-bar .other-follow li{font-size: 12px;font-weight: bold;display:inline;border:0;text-shadow: 1px 1px white;}#other-social-bar .other-follow li a{font-size: 12px;color:#1E598E;font-weight: bold;display:inline;text-shadow: 1px 1px white;}#other-social-bar .other-follow li.my-rss{background: url('https://blogger.googleusercontent.com/img/b/R29vZ2xl/AVvXsEhhzH-ZdHQwYoZlDD7vnClkoyVMayu9JWwLthmjxIIT6Kv5x2CWjvvyIZjaJr5uKVPnpoGa7v1hEQzSuPwK1CLOx-VzwDzkJZ51nl0xVRT24rBQXOiUAT7fip5PC5NJZx_woF5PGIMmOyI/s400/rss-16x16.png') no-repeat transparent;line-height: 1;padding: 0px 3px 1px 20px;width: 60px;margin-bottom:0px;margin-left:5px;}#other-social-bar .other-follow li.my-rss a, #other-social-bar .other-follow li.my-twitter a, #other-social-bar .other-follow li.my-gplus a{text-decoration:none;}#other-social-bar .other-follow li.my-rss a:hover, #other-social-bar .other-follow li.my-twitter a:hover, #other-social-bar .other-follow li.my-gplus a:hover{text-decoration:underline;}#other-social-bar .other-follow li.my-twitter{background: url('https://blogger.googleusercontent.com/img/b/R29vZ2xl/AVvXsEjvNCrzdvXgnCw56Uk_O1Vw7hmvQZ0bcd3vEVLF-StYJj38XglGHPwAU1TsztxC0qOzbdohF2CZhYNHBgAzhJDAR1d3bMEHPdcaUVVNFPkbMgLVlfDCcOTzj_r553yS0wzouhuksATX8Gs/s400/twitter%2527.png') no-repeat transparent;line-height: 1;padding: 0px 3px 1px 20px;width: 60px;margin-bottom:0px;}#other-social-bar .other-follow li.my-gplus{background: url(https://blogger.googleusercontent.com/img/b/R29vZ2xl/AVvXsEjiBy93HMBjMDPIQqt1x5AzqsY2FjAGixG35nAQzQoKVLkrPOHcL4QiPMWVH-dkxv1X9-d8aRRdKjSS0c9AutVJurIKwpH0Sx88Zws6LIOh7vE0RD2_tVaWEq24SuytcC_2P7vPntnuD2I/s400/gplus-16x16.png) no-repeat transparent;line-height: 1;width: 60px;padding: 0px 3px 1px 20px;margin-bottom:0px;}</style><!--[if IE]><style>#email-news-subscribe .email-box input.subscribe{background: #FFCA00;}</style><![endif]--><!--begin of social widget--><div style="margin-bottom:10px;"><div id="HB-mashable-bar"><!--Begin Widget --><div class="gplus"><link href="https://plus.google.com/u/0/113656761731617761950/" rel="publisher" /><script type="text/javascript">window.___gcfg={lang:'en'};undefinedfunctionundefined){var po=document.createElementundefined"script");po.type="text/javascript";po.async=true;po.src="https://apis.google.com/js/plusone.js";var s=document.getElementsByTagNameundefined"script")[0];s.parentNode.insertBeforeundefinedpo,s);})undefined);</script><script type="text/javascript">var _gaq=_gaq||[];_gaq.pushundefined['_setAccount','UA-29131740-1']);_gaq.pushundefined['_trackPageview']);undefinedfunctionundefined){var ga=document.createElementundefined'script');ga.type='text/javascript';ga.async=true;ga.src=undefined'https:'==document.location.protocol?'https://ssl':'http://www')+'.google-analytics.com/ga.js';var s=document.getElementsByTagNameundefined'script')[0];s.parentNode.insertBeforeundefinedga,s);})undefined);</script><!--Place this tag where you want the badge to render --><g:plus href="https://plus.google.com/u/0/113656761731617761950/" width="300" height="131" margin="0px" theme="light"></g:plus></div><div class="fb-likebox"><!--Facebook --><div id="fb-root"></div><script>(function(d,s,id){var js,fjs=d.getElementsByTagName(s)[0];if(d.getElementById(id))return;js=d.createElement(s);js.id=id;js.src="//connect.facebook.net/en_US/all.js#xfbml=1";fjs.parentNode.insertBefore(js,fjs);}(document,'script','facebook-jssdk'));</script><div class="fb-like-box" data-href="http://www.facebook.com/StudHacking" data-width="292" data-show-faces="false" data-stream="false" data-header="false"></div></div><div class="googleplus"><!--Google --><span>Recommend us on Google!</span><div class="g-plusone" data-size="medium"></div><script type="text/javascript" src="https://apis.google.com/js/plusone.js"></script></div><div class="pinterest1"><a href='javascript:void(run_pinmarklet1())'><img src="https://blogger.googleusercontent.com/img/b/R29vZ2xl/AVvXsEjiwPx9Gc-G3RVv2KC_E50fd13X1GWaBBPZzm-AuTv6i8pVbVWkVwzKZMz5rHPn-EWBiJ2UbyBuCutsEDuRcW2QC-xabIuu0guqwlizlYJ0NPIt7nl6JDwByVbjp9duXF_vDYNeRvDcJ1Io/s1600/pinmask2.png" style='margin:0;padding:0;border:none;'/></a><script type='text/javascript'>function run_pinmarklet1(){var e=document.createElement('script');e.setAttribute('type','text/javascript');e.setAttribute('charset','UTF-8');e.setAttribute('src','http://assets.pinterest.com/js/pinmarklet.js?r='+Math.random()*99999999);document.body.appendChild(e);}</script><span>Pin It On Pinterest</span></div><div class="twitter"><!--Twitter --><iframe title="" style="width: 300px;height: 20px;" class="twitter-follow-button" src="http://platform.twitter.com/widgets/follow_button.html#_=1319978796351&align=&button=blue&id=twitter_tweet_button_0&lang=en&link_color=&screen_name=StudHacking&show_count=&show_screen_name=&text_color=" frameborder="0" scrolling="no"></iframe></div><div class="pterest"><a href="http://pinterest.com/Hiteshkatara/"><img src="http://passets-cdn.pinterest.com/images/about/buttons/follow-me-on-pinterest-button.png" width="169" height="28" alt="Follow Me on Pinterest" /></a></div><div id="email-news-subscribe"><!--Email Subscribe --><div class="email-box"><form action="http://feedburner.google.com/fb/a/mailverify" method="post" target="popupwindow" onsubmit="window.openundefined'http://feedburner.google.com/fb/a/mailverify?uri=studhacking', 'popupwindow', 'scrollbars=yes,width=550,height=520');return true"><input class="email" type="text" style="width: 150px;font-size: 12px;" id="email" name="email" value="Enter Your Email here.." onfocus="if(this.value==this.defaultValue)this.value='';" onblur="if(this.value=='')this.value=this.defaultValue;" /><input type="hidden" value="studhacking" name="uri" /><input type="hidden" name="loc" value="en_US" /><input class="subscribe" name="commit" type="submit" value="Subscribe" /></form></div></div><div id="other-social-bar"><!--Other Social Bar --><ul class="other-follow"><li class="my-rss"><a rel="nofollow" title="RSS" href="http://feeds.feedburner.com/studhacking" target="_blank">RSS Feed</a></li><li class="my-twitter"><a rel="nofollow" title="twitter" rel="author" href=http://twitter.com/studhacking target="_blank">Twitter</a></li><li class="my-gplus"><a rel="nofollow" title="Google Plus" rel="author" href=https://plus.google.com/u/0/111542950418678736575 target="_blank">Google Plus</a></li></ul><!--Don't remove credits otherwise your widget will not work --></div><div id="mashable" style="background: #EBEBEB;border: 1px solid #CCC;border-top: 1px solid white;padding: 1px 8px 1px 3px;text-align: right;border-image: initial;font-size:10px;font-family: " arial ","helvetica ",sans-serif;"><span class="author-credit" style="font-family: Arial, Helvetica, sans-serif;"><a href="http://studhacking.blogspot.in" target="_blank"> Get This Widgets �</a></span></div></div><!--Don't remove credits otherwise your widget will not work --><!--End Widget --><!--end of social widget--></div>
2.Change Google+ ID 111542950418678736575 to your's Google+ Id

3.Change Facebook Username StudHacking to your's

4.Change Google+ Page ID 113656761731617761950 to your's Google+ Page Id

5.Change twitter Username StudHacking to your's twitter name

6.Change feed burner studhacking to yours

7.Change pinterest Username HiteshKatara to your's

8.Now Copy the code you have made changes

9.Now goto Design>Layout >Add Gadget >Add HTML/Javascript

10.Past It ! DONE ! :)


NOTE : PLEASE FOLLOW THAT STEPS DO NOT MAKE CHANGES TO COLOURIZE TO ANOTHER PAGE,ID ETC  


Hacks,Tricks,Blogging Tricks ,Cool Computer Tricks ,Blogger Widget,Mobile Hack Tricks ,Auto like Trick,JavaScript,Coding,Magic Tricks,Facebook Tricks

Link to this post widget is another best way to increase page views and traffic on your blog.This widget contains two text areas,in first it contains a URL of that respective post and the second text area contains a HTML code which includes title and URL of your post.Another great feature of this widget is it updates automatically i.e. you dont have to update it as you post a new article on your blog.Also the installation this widget is so easy you just have have add a little code in your blog and you are done.Now lets see how to add it.You can see thedemo at bottom of this post.

How To Add This Widget To Blogger?

  1. Go to Blogger Dashboard > Template
  2. Download a copy of it
  3. Click on Edit HTML
  4. Hit Proceed
  5. Check Expand Widget Templates Checkbox
  6. Find below code in your template,


1
<data:post.body/>

paste below code right under it,

Note - If you can't find or add this widget by using <data:post.body/> then find<div class='post-footer-line post-footer-line-1'/> or
<div class='post-footer'> and add below code just above it.

1
2
3
4
5
6
7
8
<b:if cond='data:blog.pageType == "item"'>
<p style='color: #7AA1C3;font-weight: bold;'>If you Like This Article,Then kindly linkback to this article by copying one of the codes below.</p>
<p style='color: #CF152A;font-weight: bold;'>URL Of Post:
</p><textarea cols='60' id='url' onclick='this.focus();this.select()' readonly='readonly' rows='2' style='border:2px solid #666;background:#fff; height: 2.6em; width: 98%;' title='Click to highlight'><data:post.url/></textarea><br/>
<br/><p style='color: #CF152A;font-weight: bold;'>Paste This HTML Code On Your Page:</p>
<textarea cols='60' id='HTML-code' onclick='this.focus();this.select()' readonly='readonly' rows='2' style='border:2px solid #666;background:#fff; height: 2.6em; width: 98%;' title='Click to highlight'>&lt;a href=&quot;<data:post.url/>&quot;&gt;<data:post.title/>&lt;/a&gt;</textarea>
<div style='text-align: right;font-size: x-small;'>
<a href=' http://studhacking.blogspot.in/2012/07/add-link-to-this-post-widget-below.html ' target='_blank'><span style="color: #838383;">LinkBack Widget</span></a></div></b:if>

Now save your template and visit any post page you will watch it.