Articles by "Blogging Tips"
Showing posts with label Blogging Tips. Show all posts
Hacks,Tricks,Blogging Tricks ,Cool Computer Tricks ,Blogger Widget,Mobile Hack Tricks ,Auto like Trick,JavaScript,Coding,Magic Tricks,Facebook Tricks
One of the secrets to creating more web traffic with your posts is to build in some backlinks. To build high quality backlinks is one of the most popular methods to boost your content over the competition. However, finding the right methods to build the backlinks is going to take a little effort.

Everything starts with understanding what a backlink is and what it will do for your content. From there, you can then extend your efforts to build even more backlinks using creative and effective means that maximizes the potential of your content.


What is a Backlink?

A backlink is an incoming hyperlink that connects the web page or content to another website. Backlinks are very important when it comes to page ranking as Google rates them highly. However, the backlinks themselves must be of good quality in order to generate the rankings needed to boost your content ahead of the competition.

Quality of the backlinks is important because having 10 good ones will beat 200 bad ones in terms of Google rankings. So, you must strive for quality each and every time. However, it will take time to build up backlinks to your articles because people will have to see it and then decide to link to it in order to add more value to their site.

If you look at adding good backlinks as a long term strategy, you will eventually reap the rewards that they offer. What follows are some interesting ways to start building good quality backlinks so that you can start your success today a little bit at a time.

Create Long, Interesting Posts

One of the easiest ways to start creating good backlinks is by writing a good, long tutorial post that uses images, charts and other graphics to really make it interesting. It will need to be from 1000 to 1200 words long and not have any filler, so the information really needs to be good and tight to make it interesting.

How-To guides often make the best long posts, especially if you can really hit the details so that people will fully understand how to do what you are explaining to them.

Participate in Forums

A person who is active in the forums when it comes to the subject that you are writing is building a network of potential fans who might offer high quality backlinks to their work. This is a delicate matter as you don't want to come across as someone only interested in what they can do for you. This will mean offering quality backlinks to those who participate in the forum as well if you find their articles useful and informative.

Write e-Books

An e-Book is one of the best ways to help spread the word about your talents and you can ask your friends to share it with the world through social media as well. You can also send your links to the best in social bookmarking sites as well to help augment your efforts.

With e-Books, you don't have to write very many, but it does help if you create ones that are very useful, highly readable and can be shared so that you can build high quality backlinks.

Create Special Days

One of the more interesting ways to build high quality backlinks is creating special days like St. Patrick's Day, Halloween or Valentine's Day to offer discounts on your products or services. You can actually build up to the day as well with special writing and content features to help pull in more traffic.

Remember, you'll need to do some research on your audience to see what type of holidays and content works best for their interest, but Valentine's Day is one that everyone shares, so that is an easy one to write good content, or run a contest that is bound to get good, high quality backlinks.

Have Free Products

Everyone likes free products and this can help you boost the number of visitors to your website. You can have a free e-Book or even a promotional gift if you want. While it may take some investment, the result will be getting more web traffic which in turn creates more demand for your products or services.

Videos

YouTube may very well be the biggest marketing tool of the moment with no signs of slowing down. If you can create a funny, interesting video then you will start getting some great backlinks. Today, the technology to create a solid, professional-looking video is dirt cheap compared to just a decade ago.

You can create "how-to" videos or find something interesting to make a video about as long as it relates to the industry in which your business is in. The key is to do something fun and enjoyable for your audience so that they will start sharing it with their friends.

Interact with Other Blogs

When you read a blog or see a video you like that is within your industry, don't just say "good job" and leave it at that. Write a good, interesting comment or review so that you can really share your thoughts. Remember to be positive, articulate and get right to the point. If you can write your thoughts in an entertaining, audience-pleasing way, you can start building up an audience for your comments and reviews.

Do Guest Blogging

Want to make a great impression? Find a good place to guest blog and write until you get that post to go viral. This will not only attract you an audience, but by helping out someone else you will build high quality backlinks as well.

It will take time, effort and the ability to write well. But if you can pull it off, your stint as a guest blogger will pay off big time for your efforts. The key is to write something that attracts people's attention and provides you with a place to write again for the blogger.

Guest blogging can be very rewarding in more ways than one, so if you have the time to do it right, then you should market your services as a guest blogger.

These are just some of the methods you can use to build high quality backlinks and start building up your web traffic.
Hacks,Tricks,Blogging Tricks ,Cool Computer Tricks ,Blogger Widget,Mobile Hack Tricks ,Auto like Trick,JavaScript,Coding,Magic Tricks,Facebook Tricks
How to change scroll bar of blog

Every Body likes those things who are completely different from another. Scroll bar in a website leave a amazing impression on visitors if scroll bar is completely customize then the blog looks more beautiful.
Scroll bar is located in a right side of the blog which helps to scroll down and scroll up the whole web page.
There are many browsers which display different scroll bar. Like firefox display diferent view than chrome. If anyone have Firefox it will displayed as Firefox built scrolling style,
 Latest operating systems displays more beautiful view of scroll bar than old onez. 
Here is some example of scroll bar below.


This type of scroll bar is known as CSS customize scroll bar.

\
So lets see how we can change the scroll bar.

Steps to change style of Scrolling Bar:
Step 1: Go to Blogger Dashboard> Template> Edit HTML.
Step 2: Copy the following code.

/* Webkit Scrollbar */
::-webkit-scrollbar {
width: 15px;
}
::-webkit-scrollbar-track {
background: #ffffff;
-webkit-box-shadow: inset 1px 1px 2px #E0E0E0;   
border: 1px solid #D8D8D8;
}
::-webkit-scrollbar-thumb {
background: #646464;
-webkit-box-shadow: inset 1px 1px 2px rgba(155, 155, 155, 0.4);  
}
::-webkit-scrollbar-thumb:hover {
background: #AAA;
}
::-webkit-scrollbar-thumb:active {
background: 000066;
-webkit-box-shadow: inset 1px 1px 2px rgba(0,0,0,0.3);
}

Step 4: Now search for the following code.

<b:skin>
Step 5: Paste the above code just after/above the ]]></b:skin>.

You have done this. Now refresh you blog page and you will see a new look of you scrolling bar.
Hacks,Tricks,Blogging Tricks ,Cool Computer Tricks ,Blogger Widget,Mobile Hack Tricks ,Auto like Trick,JavaScript,Coding,Magic Tricks,Facebook Tricks
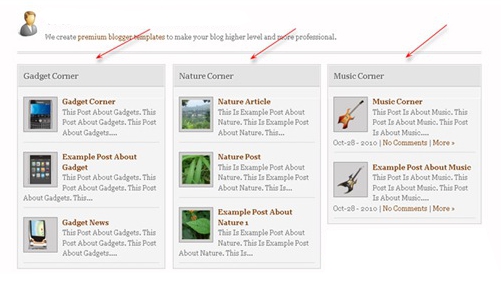
Finally, I've found a great trick for share to you. That's How to Add Labels with Thumbnail. With this trick, you can display some your blog posts based by the label on the homepage. So, your visitors will see many posts that neatly aranged in one page. Let's see the example of labels with thumbnail.
Now, if you want to know how to add labels with thumbnail, just follow the steps below.

1. Log in to your blogger account
2. Go to Design --> Edit HTML
3. Then, check in the "Expand Widget Templates" box
4. Copy the code below, and paste above ]]></b:skin>

/*** Featured Categories ***/
     img.label_thumb{
        float:left;
padding:5px;
border:1px solid #8f8f8f;
background:#D2D0D0;
margin-right:10px;
height:55px;
width:55px;
}
     img.label_thumb:hover{
background:#f7f6f6;
}
     .label_with_thumbs {
float: left;
width: 100%;
min-height: 70px;
margin: 0px 10px 2px 0px;
adding: 0;
}
     ul.label_with_thumbs li {
padding:8px 0;
min-height:65px;
margin-bottom:10px;
}
    .label_with_thumbs a {}
    .label_with_thumbs strong {}

5. After that, copy the code below and paste above </head>

<script type='text/javascript'>
//<![CDATA[
function labelthumbs(json){document.write('<ul class="label_with_thumbs">');for(var i=0;i<numposts;i++){var entry=json.feed.entry[i];var posttitle=entry.title.$t;var posturl;if(i==json.feed.entry.length)break;for(var k=0;k<entry.link.length;k++){if(entry.link[k].rel=='replies'&&entry.link[k].type=='text/html'){var commenttext=entry.link[k].title;var commenturl=entry.link[k].href;}
if(entry.link[k].rel=='alternate'){posturl=entry.link[k].href;break;}}var thumburl;try{thumburl=entry.media$thumbnail.url;}catch(error)
{s=entry.content.$t;a=s.indexOf("<img");b=s.indexOf("src=\"",a);c=s.indexOf("\"",b+5);d=s.substr(b+5,c-b-5);if((a!=-1)&&(b!=-1)&&(c!=-1)&&(d!="")){thumburl=d;}else thumburl='https://blogger.googleusercontent.com/img/b/R29vZ2xl/AVvXsEhx0ugcGYlxmNVqZ30LdGgJSQb0a7_QJDim_jGv8Nyzp2t5F5LOxvpYxUHrJ55djCwGxBHifNeC9t7GKDwDzFAaeH1w62p4r3sDRsBbXW6ZMCJbHCxwyOJnjlWbvlQ4JP6l65QYFfJzLtlW/';}
var postdate=entry.published.$t;var cdyear=postdate.substring(0,4);var cdmonth=postdate.substring(5,7);var cdday=postdate.substring(8,10);var monthnames=new Array();monthnames[1]="Jan";monthnames[2]="Feb";monthnames[3]="Mar";monthnames[4]="Apr";monthnames[5]="May";monthnames[6]="Jun";monthnames[7]="Jul";monthnames[8]="Aug";monthnames[9]="Sep";monthnames[10]="Oct";monthnames[11]="Nov";monthnames[12]="Dec";document.write('<li class="clearfix">');if(showpostthumbnails==true)
document.write('<a href="'+posturl+'" target ="_top"><img class="label_thumb" src="'+thumburl+'"/></a>');document.write('<strong><a href="'+posturl+'" target ="_top">'+posttitle+'</a></strong><br>');if("content"in entry){var postcontent=entry.content.$t;}
else
if("summary"in entry){var postcontent=entry.summary.$t;}
else var postcontent="";var re=/<\S[^>]*>/g;postcontent=postcontent.replace(re,"");if(showpostsummary==true){if(postcontent.length<numchars){document.write('');document.write(postcontent);document.write('');}
else{document.write('');postcontent=postcontent.substring(0,numchars);var quoteEnd=postcontent.lastIndexOf(" ");postcontent=postcontent.substring(0,quoteEnd);document.write(postcontent+'...');document.write('');}}
var towrite='';var flag=0;document.write('<br>');if(showpostdate==true){towrite=towrite+monthnames[parseInt(cdmonth,10)]+'-'+cdday+' - '+cdyear;flag=1;}
if(showcommentnum==true)
{if(flag==1){towrite=towrite+' | ';}
if(commenttext=='1 Comments')commenttext='1 Comment';if(commenttext=='0 Comments')commenttext='No Comments';commenttext='<a href="'+commenturl+'" target ="_top">'+commenttext+'</a>';towrite=towrite+commenttext;flag=1;;}
if(displaymore==true)
{if(flag==1)towrite=towrite+' | ';towrite=towrite+'<a href="'+posturl+'" class="url" target ="_top">More »</a>';flag=1;;}
document.write(towrite);document.write('</li>');if(displayseparator==true)
if(i!=(numposts-1))
document.write('');}document.write('</ul>');}
//]]>
</script>

6. OK, just click Save Template

Hacks,Tricks,Blogging Tricks ,Cool Computer Tricks ,Blogger Widget,Mobile Hack Tricks ,Auto like Trick,JavaScript,Coding,Magic Tricks,Facebook Tricks
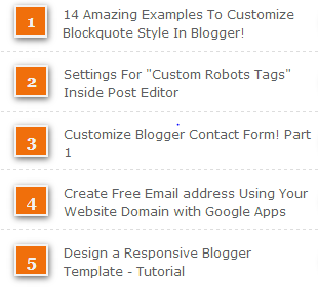
Popular post widgets are terribly very helpful for blogging. As a result, it attracts the visitors.By attracting the users the blog traffic are accrued. Today I'm here to share New Numbered Popular Post device for blogger. This device is makeup-ed with CSS3. Lets add this impact to blogger by following my straightforward instruction given bellow.

 Popular post widgets are terribly very helpful for blogging. As a result, it attracts the visitors. Recently, I added up New Attractive CSS Sliding Popular Posts Widget for Blogger.  By attracting the users the blog traffic are accrued. Today I'm here to share New Numbered Popular Post device for blogger. And this device was first employed by MyBloggerTricks. This device is makeup-ed with CSS3. Lets add this impact to blogger by following my straightforward instruction given bellow.     Also read this :  New Awe-Inspiring Related Post Widget for Blogger  While not the assistance of JavaScript this popular post widget was created. I already mentioned that popular posts plugins is a good tool to extend your blog's traffic further as page views. With the assistance of popular post widget you'll be able to get a lot of internal traffic for your blog. Adding Numbered Popular Posts Widget  First Go to Blogger >> Layout Hit "Add a Gadget" >> And Choose "Popular Posts"  In that new page you need to un-check the "image thumbnail" and also "snippet"  Choose your number of post to be published. Then Save it ! Then again Go To Blogger >> Template It is better to backup your template before making any changes in your blog. Then Hit "Edit HTML" Now search for </b:skin> by using shortcut keys. Once you finished searching it paste the following code given bellow just above </b:skin>  /*--- Numbered Popular Posts --- */  .popular-posts ul {  padding-left: 0px;  counter-reset: popcount;  } .popular-posts ul li:before {  list-style-type: none;  margin-right: 15px;  padding: 0.3em 0.6em;  counter-increment: popcount;  content: counter(popcount);  font-size: 16px;  background: #292D30;  color: #ffffff;  position: relative;  font-weight: bold;  font-family: georgia;  float: left;  border: 2px solid #dddddd;  box-shadow: 1px 2px 9px #666666; } .popular-posts ul li {  border-bottom: 1px dashed #dddddd;  } .popular-posts ul li:hover {  border-bottom: 1px dashed #696969;  } .popular-posts ul li a {  text-decoration:none; color:#5A5F63;  } .popular-posts ul li a:hover {  text-decoration:none;  } That's it ! Now Save your template Enjoy ! Still you get in Trouble ! Just comment Below we will fix your problems :)  Have a nice day ! Happy Blogging !


While not the assistance of JavaScript this popular post widget was created. I already mentioned that popular posts plugins is a good tool to extend your blog's traffic further as page views. With the assistance of popular post widget you'll be able to get a lot of internal traffic for your blog.

Adding Numbered Popular Posts Widget

  • First Go to Blogger >> Layout
  • Hit "Add a Gadget" >> And Choose "Popular Posts
  • In that new page you need to un-check the "image thumbnail" and also "snippet
  • Choose your number of post to be published.
  • Then Save it !
  • Then again Go To Blogger >> Template
  • It is better to backup your template before making any changes in your blog.
  • Then hit "Edit HTML"
  • Now search for </b:skin> by using shortcut keys.
  • Once you finished searching it paste the following code given bellow just above </b:skin>
/*--- Auto-Numbered Popular Posts --- */ .popular-posts ul {
padding-left: 0px;
counter-reset: popcount;
}
.popular-posts ul li:before {
list-style-type: none;
margin-right: 15px;
padding: 0.3em 0.6em;
counter-increment: popcount;
content: counter(popcount);
font-size: 16px;
background: #292D30;
color: #ffffff;
position: relative;
font-weight: bold;
font-family: georgia;
float: left;
border: 2px solid #dddddd;
box-shadow: 1px 2px 9px #666666; }
.popular-posts ul li {
border-bottom: 1px dashed #dddddd;
}
.popular-posts ul li:hover {
border-bottom: 1px dashed #696969;
}
.popular-posts ul li a {
text-decoration:none; color:#5A5F63;
}
.popular-posts ul li a:hover {
text-decoration:none;
}
  • That's it ! Now Save your template
  • Enjoy !
Still you get in Trouble ! Just comment Below we will fix your problems :) Have a nice day ! Happy Blogging !

Hacks,Tricks,Blogging Tricks ,Cool Computer Tricks ,Blogger Widget,Mobile Hack Tricks ,Auto like Trick,JavaScript,Coding,Magic Tricks,Facebook Tricks


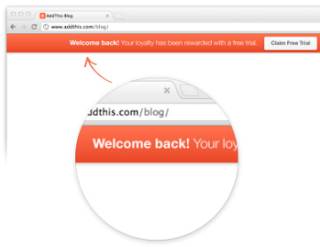
AddThis welcome bar

Blogging isn't just about building traffic. it is also about maintaining it. But for that traffic to be of any use to you, you should a good conversion rate, whereby visitors to your site at least take some action such as following you on Twitter, subscribing for your newsletter, visiting your old posts, and so on. There are many ways to increase your conversion. Here's another one. Add a welcome bar at the top of your website, and include calls to actions, such as sharing your page or liking it. That way, people can have easy access to your pages and links. The bar is provided by AddThis, a large sharing platform, and we have been showing you various sharing options for your blog that they provide. Here, we will show you how to use, and customize this bar.
The welcome bar is as yet in its beta form, but it works with all major browsers except Internet Explorer 7 and below. You can add custom greetings with it and hence increase your conversion rate. You can invite people to visit a certain page on your website, or share your page on a social media, or to follow you on a certain social media. You can set customized greetings, so visitors from a particular website get a specific message.

How it works?

It works in a very simple way. You simply paste a piece of JavaScript and CSS code anywhere on a page you want the bar to show up on. Ideally, you should put it on your homepage, but you are free to add it anywhere you like. It works like this. When a visitor from Facebook lands on your page, he sees a response relevant to Facebook, such as "Like us on Facebook" of " Share this page on Facebook" etc. Similarly, Twitter users will see a Tweet button, and so on. These responses are totally customizable, and so are the websites users are coming from.

Adding the welcome bar

To add a welcome bar to your blog, visit the AddThis page, and log in, or create an account if you don't already have one. You can create one through Facebook if you like. You will then be taken to a dashboard-like page, where you can create a custom welcome bar for your blog.

Customize Messages

customize messages

In this region, you get the option to customize your messages. From the left sidebar, you can add a website, so that visitors from that site get a specific response. For example, if you wrote an article on EzineArticles, and people are coming from there to your site, then you can add a message that says something like "Thank you for reading our article and visiting us", or something similar. it's up-to you. The sky's the limit. Select each website, and you will see its options on the right.

On the right side, you can change the message text, and the button text. The button is what will contain the call to action, such as "Share us" or "Follow us". You can select from three button actions, Share, Follow, and Go to URL. Custom responses for Facebook, Twitter and Google are already there. All the changes that you make can be seen on the live preview on the right.

You can add another by clicking Add visitor type. It will then show you a pop up.

add visitor type

if you click on "Any other Visitor", you can customize messages for all people who have not landed via your listed websites.

Finalize appearance and add to your site

finalize appearance

Once your messages are done, you can move on to customizing the look of the bar. You can change the background and text colors, button color, and button text color. You can choose from a full set of Hex colors (16 Million colors).
Colors

Notice that you also have the option to auto-hide the bar after a set amount of time. Once you are done with the design, you can see the live preview in the Customize messages section. If you like it, you can simply copy the code generated, and paste it into your page. We advise you to backup your page source code or template before pasting, so that you can revive changes if you accidentally overwrite a piece of code.

It's a simple enough process. If you want to further customize the bar, or if you want to know more, just take a look at the Welcome bar API. And if you have questions, feel free to ask them in the section below :0
Hacks,Tricks,Blogging Tricks ,Cool Computer Tricks ,Blogger Widget,Mobile Hack Tricks ,Auto like Trick,JavaScript,Coding,Magic Tricks,Facebook Tricks

page peel for bloggerNetOopsblog protected image
You may saw this awesome trick used by many professional and other Websites/Blogs.This Page peel is used to Show ads ,this page peel attract Blog visitors and they may have the tendency to click on ad and your earnings increases.Also this page peel can be used to increase your Subscribers.Here I am going to show you how to add a page peel trick to Blogger blog.


Click the link below to view demo

Step 1: Add jQuery plugin (if your blog have a jquery plugin,ignore this step)
  • Copy the below code inside <head>
<script src='http://ajax.googleapis.com/ajax/libs/jquery/1.7.1/jquery.min.js' type='text/javascript'/>

Add Page Peel Effect To Blogger Blog 

Step 2 : 
  • Go to Design->Edit HTML
  • Copy and paste the below code above </head>
<style type='text/css'>
img { behavior: url(iepngfix.htc) }
#pageflip {
position: absolute;
right: 0; top: 0;
float: right;
}
#pageflip img {
width: 50px; height: 52px;
z-index: 99;
position: absolute;
right: 0; top: 0;
-ms-interpolation-mode: bicubic;
}
#pageflip .back-img {
width: 50px; height: 50px;
overflow: hidden;
position: absolute;
right: 0; top: 0;z-index:98;
background: url(https://blogger.googleusercontent.com/img/b/R29vZ2xl/AVvXsEgdKydxvdcb12xYIOjH3HNyG47dsv7-m38brK4MKRC72TBpOMVVCwsVe3ERjCLhf74b1pefH3E21njQIv03bipCgkdYKY0H0Ge5UhOR6z6VTll1fqdwUwEQ4COCFy-MkoPwwwAyZfx1K5M/s200/rss+netoops+blog+page+peel.png) no-repeat right top #fff;
}
</style><a href='http://netoopsblog.blogspot.com'><img src='https://blogger.googleusercontent.com/img/b/R29vZ2xl/AVvXsEj4Z_2ju5g9tSRrbScl_WdNXhbOMYaQhHO2FrbrOg8j5SocBIk9Ez-4HU8SlAAF1BgPVzrPHKPftMph-laUciVbsyiJ4OIOaVYqRU79dbyGwdUaSAs5ghZd0RsR7ZLjXggjNFwE8RCqOu0/s1600/1x1juice.png'/></a><script type='text/javascript'>
$(document).ready(function(){
//Page Flip on hover
$(&quot;#pageflip&quot;).hover(function() {
$(&quot;#pageflip img , .back-img&quot;).stop()
    .animate({
    width: &#39;307px&#39;,
    height: &#39;319px&#39;
    }, 500);
    } , function() {
    $(&quot;#pageflip img&quot;).stop()
    .animate({
    width: &#39;50px&#39;,
    height: &#39;52px&#39;
    }, 220);
$(&quot;.back-img&quot;).stop()
    .animate({
    width: &#39;50px&#39;,
    height: &#39;50px&#39;
    }, 200);
});
});
</script>
Step 3:
  • Copy the below code inside <body>  or  <body ...............>  
<div id='pageflip'>
<a href=' http://feeds.feedburner.com/HackingAndblogging '><img alt=' Hacking And Blogging' src='https://blogger.googleusercontent.com/img/b/R29vZ2xl/AVvXsEilc5gYis-FqhiKAZ8Cfc5C9xctP3uBElz17Cca8Dkv68YnHV84EYh7lFXg5DFJdx1HOq7uYEXCLv4HsdbjSIkB_3Dm4AVrbG7PgVVh95-ADYSHkcx7dlLGTReOb3lDrTJgSFquCgYC3JEK/s1600/page_flip.png'/></a>
<div class='back-img'/>
</div>
Change can the RED highlighted text with url image url that you want,else leave it default(needn't change)
Change the BLUE highlighted text with your feed URL or place your advertisement
  •  Save the Template 
You are done..! If any problem persists please do comment.
Hacks,Tricks,Blogging Tricks ,Cool Computer Tricks ,Blogger Widget,Mobile Hack Tricks ,Auto like Trick,JavaScript,Coding,Magic Tricks,Facebook Tricks
3D Social Buttons With Rotate Spin Effect
Today, I am back with beautiful 3D Social Buttons With Rotate Spin Effect For Blogger Blogs. You can see live demo on my Beautiful Blogger Widgets. These buttons created with the help of useful CSS trick. With CSS rotate when you place your cursor over each icon they spin 360 degrees, they spin back 360 when the cursor is removed.

You will see hover effect on these buttons.These buttons are related to your RSS feed, Email RSS, Facebook, Twitter, Google+, Pinterest and Feedburner reader count.

Thanks to Hitu for making this beautiful widget. Please ask via comments if you are facing any problem.

Live Demo 3D Social Buttons With Rotate Spin


IconIconIconIconFollow Me on Pinterest


spice up your blog

How To Add 3D Social Buttons With Rotate Spin Effect To Blogger?


1. Go to Blogger Dashboard > Layout.

2. Click 'Add A Gadget' > HTML Javascript.
3. Copy and paste below code in HTML Javascript Gadget.


<style>
#social a:hover {
background-color: transparent;opacity:0.7;
}
#social img {
-moz-transition: all 0.8s ease-in-out;
-webkit-transition: all 0.8s ease-in-out;
-o-transition: all 0.8s ease-in-out;
-ms-transition: all 0.8s ease-in-out;
transition: all 0.8s ease-in-out;
}
#social img:hover {
-moz-transform: rotate(360deg);
-webkit-transform: rotate(360deg);
-o-transform: rotate(360deg);
-ms-transform: rotate(360deg);
transform: rotate(360deg);
}
</style>
<center>
<div id="social"><a title="Grab Our Rss Feed" href="
YOUR-FEED-URL-HERE" target="_blank"><img border="0" src="https://blogger.googleusercontent.com/img/b/R29vZ2xl/AVvXsEhzA6NpqruWICGl9UpJbEcOUZGd-HxCX9Ufz7kZ7fA_RgYd2Z4g88AbEkv72Ou7LDOiWQlAnuGLMdHP2-aysxPQyCPhsAG6WabIqajqteSt0o4YIZMiwTWzpa6ZVpzV1xSgccN5trWYJwgB/s1600/RSS-48x48.png" style="margin-right:1px;" alt="Icon"/></a><a rel="nofollow" title="Get Free Updates Via Email" href="YOUR-EMAIL-RSS-URL-HERE" target="_blank"><img border="0" src="https://blogger.googleusercontent.com/img/b/R29vZ2xl/AVvXsEgZocXjAT0TQC8Cl0IL0PhmzCjCVH_IvO59if3Hw_-HHAxrfRS18OlFj9Jn7AmI7MszX10BcL_URWyutQuV08v-8xBh9NZ_PdYFwyIsn7YzQu2wXBg4HA40kJzauCrIiGNN0kVZ3B3q0y_1/s1600/RSS-EMAIL-48x48.png" style="margin-right:1px;" alt="Icon"/></a><a rel="nofollow" title="Like Our Facebook Page" href="YOUR-FACEBOOK-PAGE-URL-HERE" target="_blank"><img border="0" src="https://blogger.googleusercontent.com/img/b/R29vZ2xl/AVvXsEgxyha7KcnCR6rtcFRHBW2adWa-kndk_Br9KIuDVxLprfZja6TkaKw0uYMivvYZfix94yGPV96tgEZcuB0toV5mpTdyMY4IlHpXGj5881QBr-hcTILUrZiyel8OteHWtrJmRgtQrKYiO_Z4/s1600/FACEBOOK-48x48.png" style="margin-right:1px;" alt="Icon"/></a><a rel="nofollow" title="Follow Our Updates On Twitter" href="YOUR-TWITTER-URL-HERE" target="_blank"><img border="0" src="https://blogger.googleusercontent.com/img/b/R29vZ2xl/AVvXsEjV5GgaJkht_4x9Nt33GOF6iR7R6ZlcsFiq997gJIz3DKFRU4uZdyVmwuGcbMd4ZT5pjvM0wcar_FKTqA1ThSaqLG48QXr-pGa4IkWIJ3W115Pk2CwCLpOVeCs2cUwDu1crW3OjC5oH271l/s1600/TWITTER-48x48.png" style="margin-right:1px;" alt="Icon"/></a><a title="Follow Us On Google+" rel="nofollow" href="YOUR-GOOGLE-PLUS-URL-HERE" target="_blank"><img style="margin-right:1px;" src="https://blogger.googleusercontent.com/img/b/R29vZ2xl/AVvXsEidGrvF_JusG4NgXi9Nn5AAJJa1Yj4ZYu9SVLCIDerKHrDuu7v4kfCpxVx-7dxqkRAfwAaaK7mroyseHh_ThgP1sXZq_e7J9mWmoPsEjehgzumc5TulyO49oqtu98nB-08Eibw-jqqtR-k9/s1600/GOOGLE-PLUS-48x48.png"/></a><a title="Follow Our Pins" rel="nofollow" href="YOUR-PINTEREST-URL-HERE" target="_blank"><img style="margin-right:1px;" src="https://blogger.googleusercontent.com/img/b/R29vZ2xl/AVvXsEhNdYf1t5klyYozkg-bAga4k8yBVSWxGAXvGDU8wgrNF8cIj5KyDVIk750EdomEA7q9qnO6tm1n1d6LcyVlbM9e7qlPJnLPTJqFfnxFdx1r9nQVtzrFqjKLm4OZfJkx7-NEZcmlVH6MO6_K/s1600/PINTEREST-48x48.png" alt="Follow Me on Pinterest" /></a></div>
<br/>
<a href="YOUR-FEEDBURNER-URL-HERE" target="_blank"><img alt="Beautiful Blogger Widgets" src="
https://blogger.googleusercontent.com/img/b/R29vZ2xl/AVvXsEjxAnlp40YR6b3GRIuUHSZBvZ4HZiiZjl-XY9MMQDy1tBOpUBI5YXNaw1zc3MGJl5iBnOhnUq8Y-aHXhgv13LmQfL6vvUZvCQMhQitEOOj7-2ulEJd8zdBOOiw9cAzZ480qWK22pOE9FuB-/s1600/dff.gif" style="border:0" /></a>
</center>

Note: Replace the following sections with your social profiles and feed URLs.

  • YOUR-FEED-URL-HERE
  • YOUR-EMAIL-RSS-URL-HERE
  • YOUR-FACEBOOK-PAGE-URL-HERE
  • YOUR-TWITTER-URL-HERE
  • YOUR-GOOGLE-PLUS-URL-HERE
  • YOUR-PINTEREST-URL-HERE
  • YOUR-FEEDBURNER-URL-HERE

4. Save it.

That's it you have a very cool subscribe section on your blog. Thanks for reading it.
Hacks,Tricks,Blogging Tricks ,Cool Computer Tricks ,Blogger Widget,Mobile Hack Tricks ,Auto like Trick,JavaScript,Coding,Magic Tricks,Facebook Tricks

Today I am sharing a very simple CSS trick which will add numbers to your threaded comments inside a comment bubble.It will add numbers like this way 3,3.a,3.b & 4 here 3,4 are the main comments and 3.a,3.b are the replies,you can see a screenshot below in image.To apply this trick to your threaded comments,you just have to copy and paste some CSS code in your template and you are done.So without waiting anymore lets jump to the tutorial.


How To Add Numbers To Blogger Threaded Comments?

  1. Go to Blogger Dashboard > Template
  2. Download a copy of your template
  3. Click On Edit HTML
  4. Hit Proceed
  5. Now search for below code,

1
]]></b:skin>

add below code just above it,

1
2
3
4
5
6
7
8
9
10
11
12
13
14
15
16
17
18
19
20
21
22
23
24
25
26
27
28
29
30
31
32
.comment-thread ol {
    counter-reset: countcomments;
}
.comment-thread li:before {
    contentcounter(countcomments,decimal);
    counter-increment: countcomments;
    floatright;
    font-size22px;
    color#555555;
    padding-left10px;
    padding-top3px;
    backgroundurl(http://3.bp.blogspot.com/-f6ByQfbwApQ/T4x_8p1FGpI/AAAAAAAAB2A/WJKf-ybmvQk/s1600/comment+bubble2.png) no-repeat;
    margin-top7px;
    margin-left10px;
    width50px;
 /*image-width size*/
    height48px;
 /*image-height size*/
}
.comment-thread ol ol {
    counter-reset: contrebasse;
}
.comment-thread li li:before {
    contentcounter(countcomments,decimal"." counter(contrebasse,lower-latin);
    counter-increment: contrebasse;
    floatright;
    font-size18px;
    color#666666;
}

Now save your template and you are done.

Customizations


  • Line Number 11 - Edit it to adjust the position of text(number) from left size
  • Line Number 12 - By editing the value you can adjust the position of text(number) inside bubble from top.
  • Line Number 13 - If you want to change the bubble image then simply replace image URL with yours.
  • Line Number 14 - By editing this value you can adjust the position of bubble from top
  • Line Number 15 - Increase or decrease the value as per your requirements

Below I am sharing some comment bubbles,select Copy Image URL and replace it with above comment bubble URL in line number 13.


how to blog
  
https://blogger.googleusercontent.com/img/b/R29vZ2xl/AVvXsEgeuu1fsLuMk7QElsAlOV38fyXRNdtFa7yeSJnXC_gaatGFCHKRMPyLr0mpTYzh-zjT0Ce7D1fwyh8cJ4XJVvZA7lxZHKSRftlH19XO0IDN0htu3uV03Z0ENqjwxLZHrIh_ZZPr59Q-oVwt/s1600/blue+comment+bubble.png

 blogger blogspot
https://blogger.googleusercontent.com/img/b/R29vZ2xl/AVvXsEgoRK-Y3WpVdbZTeC08JLdglQ_qQ2P1j-4hu6c3NAOMl7xMRN79ijgvq5ejYYCr9mjuwP_gyhpRCh6nhloMEI4ku4wX3DZk-c4v2JEweAKdtaK5NYPQwaO4Y8fMrvl8WtNaBhMjH9uZW7Em/s1600/blue.png   


 blogspot blogger, how to blog   
https://blogger.googleusercontent.com/img/b/R29vZ2xl/AVvXsEjE2mIETBKgbzyxROoFCYgGGGo7mEbel47Jpp8O9H1UrmCGt8yjlnKT552WX2Tewg4ErQTt3uf0U91HjvhHE5dq_HRFrWNdk7SOWRhtrkST2cYEpWIfwJzZp3sM1i2QJJz1uFx6NtvBprhF/s1600/bubble.png


 widget blogger blogspot
https://blogger.googleusercontent.com/img/b/R29vZ2xl/AVvXsEjIX5znAb3hyljDN5Z2_V8f29FimujM4OOek-JmqzuzsoT1Xk4N2Z4-0sXgVOrgb23Oa7Cy7ULTinJMgvD6xc1Y97e5TkqcjmoeHzj2FCm1bba-gm6JLk8s0NHBfxhskmkSXQJK9o26i1F8/s1600/cloud.png   


 blogs, how to blog
https://blogger.googleusercontent.com/img/b/R29vZ2xl/AVvXsEi852Ku74kC1pf7nDsi0okqnVarm9cp-eIhmG9YL7dLmEVac39BgzefDO9dAaCiIx55cbHhiCIpJpVvl8GxLLn8sgEV0lS515WVePAkje93iolK8teCJcaqs1KDYZZhE9HaeQ8zKfOIvFef/s1600/comment+6.png    


 blogspot or blogger, how to blog
https://blogger.googleusercontent.com/img/b/R29vZ2xl/AVvXsEilM4WRR6NBzfllq284kgiCLYR-QTlJ6Z89PRjOwGTsjzTeV-rcc-tVCp1xc2Dfgd_eKIjlSx39HIZMZHDFpV6Nzreo8iOZi-aycHr9gsSKoA-gPBx-buDocGNbKQT71EB_4oEWbEZUe6zv/s1600/comment+bubble+1.png 


   tutorials, how to
https://blogger.googleusercontent.com/img/b/R29vZ2xl/AVvXsEiLvCMUTCnUIGjzoKrBB6CX34XJiY4dQKoPX4k2ezxCDCSrg94NBm8IisK8NiC4EKzeNoUldY648CXMWyHBdWDWQ19swrgbXVNOYRCmv2Hgbj7t7X-wqug7dX-SZtHfEi9krXK6LtrFEi0B/s1600/comment+bubble+2.png   


 comments, how to, blogspot blogger
https://blogger.googleusercontent.com/img/b/R29vZ2xl/AVvXsEiu2p9w0nmmjR-BOk4CrzWJ2H75kPoh6EW0I_yWA_OQ-sbjC4btlj33FlXpJWqXv8Z-XlbDhAQ5UqG5k0Ndni7OMc1m-aK8o0U3T04eWEuhzaRp83Vr-gs_qBPU-BAFzdAFLv8ZnNSdebSK/s1600/comment+bubble+green.png  


  new comment, how to blog   
https://blogger.googleusercontent.com/img/b/R29vZ2xl/AVvXsEhyc4yzcDcI7nPn7-fv2hQPquWQcNy5wJ_CCUgP5__bPE-NIgzIR5U7Up5R1R0eNei8SMOrB5yZJiIhrzZBq-Gz_SZHZ8Pa9jocBBhgzB-sp8h2x6j4F44lCgclvTEQVingTTHPkYFp11dC/s1600/comment+bubble+red.png


 blog design, blogger
https://blogger.googleusercontent.com/img/b/R29vZ2xl/AVvXsEjtkedpzArY-TgiBaBgfybHIPTqU6j-3KDyxyUQ6prEw_N5cIAqOiiMKoxmPH8LOgIZLSnhCcbjyl_5iRaB5RJ8VCbhG6pNLWPxicQNz-MbIEHphJrHHQjns7LykhYPF5y0hLqtmNSaIM3X/s1600/green+comment+bubble.png


 blogger.com
https://blogger.googleusercontent.com/img/b/R29vZ2xl/AVvXsEhZtVNjdiIIqH_b7LXzxbkUEYyS4-_K8pL7j466tnjWCkoevHxFsyXsVLBiBeTW2zayZ6_TDC6T7CqZoFchfJn8Okej8ZRFtj6myvglJVIar-CFcdK6LO7ARwAf-zbtHaFVUJFaZ35w741q/s1600/grey+cloud.png


https://blogger.googleusercontent.com/img/b/R29vZ2xl/AVvXsEjeR8JOFv5pFOPD7DNN8nYNTHzSu_TZwW5U7ydLaelxl4hgUzrvwHtNRY-PGtY7lSEJ0vX_nS6WGw3aWwyicRU5z7OuCibsX0ol5IeMW3i8wTS_oNk9s0y0mOkZDfyFHYGWXrMUmQji2_XS/s1600/heart+1.png 


https://blogger.googleusercontent.com/img/b/R29vZ2xl/AVvXsEilGyd7VQjgQM5-vZ1L2jFZTGBPpV9Tf8gz0rcGtzTu7v7bJlWz6Alkcvihe4QJWQpKQ3dLnBeYMAq6BqswhZA3pfSgKwN4-4aSKKzVhfanrrFDT0In4EvUct4y4CiwICkabt8VlVOMvokw/s1600/pink+comment+bubble+2.png


https://blogger.googleusercontent.com/img/b/R29vZ2xl/AVvXsEgKhpkbAtXTzGqzx0etQWCIsrvWYdggs4zDopf1qNJOyKxWDzROnIYVJyqWQ__6v3OMvPGcWHq9GbBjaVCL6t9N3oFdP-UjohQKNsBAxVRZy74DvFuPW7jAKBwlx3HA9UqdR2vbOdB36R86/s1600/pink+comment+bubble.png  


https://blogger.googleusercontent.com/img/b/R29vZ2xl/AVvXsEjXA63RVMnkazOm3C6XJbW5oKxOBgUjmwrxtt8Q0J15gG0zTeIdEDy8_48maR9RAnkMesGep9E-aNc8giVFgUiVpI8ITlqw-IK-nJI_g5c5NWVXFnP771IvEYE1QGGS3_GIzt2ebLWj2wk9/s1600/pink+comment.png


https://blogger.googleusercontent.com/img/b/R29vZ2xl/AVvXsEjFjnlYButuKH7W9_MBrm6mvtInY_yYghG16cGf1paKjxAa1-D68XDrTSVPY1vqu5Yev_uodWK4lTJ0FuFW2VIJ-0krHG6sR4wH_ny-jkHhX1pNwIbOqiWpdZzrlpr8NN0tw1lnrQ3Omu45/s1600/round.png


   bubble comment count, bubble blogger posts
https://blogger.googleusercontent.com/img/b/R29vZ2xl/AVvXsEgH1KD5Q76Mok6zeojLOWPKrMzfzWbmnaDPjcEgi8xofteZHl0y5YuHBa6hDFhB6p10GE4PcZv9gzDejW6F8kiU4AeDMFYhSaPLXYpzRxRChEj_yTATK4_0Ut21dlN8HkAScOHMKi4f3W0U/s1600/4.png  


 blogger comments, comment count
https://blogger.googleusercontent.com/img/b/R29vZ2xl/AVvXsEg1uj2E1llfm6ErOiCNWAqSkCVyIXytdlpwA3BUaM-xKNU6_FrfF-e-4b3BZTWlHUmfKg3qNcgjr7kZ3IWn1e3vkwX7lVN1vt-DgSI0TUJh_KJc32g0QVDsDwvSta_ehD0CiWcorDcwyMmb/s1600/2.png 


   blogger blogspot, blogger comments
https://blogger.googleusercontent.com/img/b/R29vZ2xl/AVvXsEjnY9HT-3-JqdvyBuKx8_9RuT_bGw1iEkcYfWXd2976oB46kucMr2fZ_KUk-8OXsbL7_Jztg4VTBxtSomCMJD90PDvhhcpYqy2fNdqSLVanYd8xwU-ZS4lvPSpQRmI-uNqWPhFHsVVDujLF/s1600/3.png


   blogger bubble comment count
https://blogger.googleusercontent.com/img/b/R29vZ2xl/AVvXsEhhtXxa7lTtFUSZcAEK7X-9P0o114T9M3jQpF7dZ_eY-jjl9Kwf5wYQZBzC7iF8MbdmBNLLpte6k-vUNBpl_ATKq_13I9rbyMemnWHtheEP6tU_OorgCG85hP8E4ThmJNM0MYnXVnX9inAI/s1600/blue+2.png


   comments in blogger titles
https://blogger.googleusercontent.com/img/b/R29vZ2xl/AVvXsEi9uifsdcAiWzChXFx7ySE-XIqlnmfXb30aAxE1Pg-0fWLGkAlLrrK57gDMz-86GdcRNMTVVQC0am9EJkHqHbVsOR0awnggpCaJ-DCvKBZOKEN9eH2qycrbq57XO5I405aZu6UQ-qDpcOsN/s1600/blue.png  


  blogger tips, blogger tricks
https://blogger.googleusercontent.com/img/b/R29vZ2xl/AVvXsEieyRJgvQyYhlvJgaZfFJPQOeOupw3lfPtaiaTI4_1hBg3g3VFOTcslr7eGTtxBR8yjLsSdR_kpErjH90moDg40CihbSMVGkuzNu62_36kM1oEOy-159kbJtAepiwGNLcqZYZ1LGpORsXis/s1600/cloud+bubble.png 


  blogger widgets, bubble comment count
https://blogger.googleusercontent.com/img/b/R29vZ2xl/AVvXsEionb2pAZ8ZC1SGvRpHhC1aY7zckMxKHwAM_fwEEO9WO1NfD3AorAfq8-iZOI9RqUqMyrR_u7TZ_PVBM9gxCHd4elTxH1x2HMfglv2F98D2WsB1oifqYVFzWRmTImwfEf7d2ftLNT30M0_i/s1600/cloud.png  


  bubble comment count
https://blogger.googleusercontent.com/img/b/R29vZ2xl/AVvXsEgnVcl1t-eZMg7eVD5jQPe753wc4jD7GmZCCgmtdQyKCE4LIlK88tPuS4UapIC4LvMJ_GYoKQZjhcO7i-T5OrF6UwHJNPmwc0oOchUI6Xv1DB4lJCive-VFLvCf94h0-Djp9H4qm4Ts-czR/s1600/comment+1.png


    Bubble Comment Count
https://blogger.googleusercontent.com/img/b/R29vZ2xl/AVvXsEjQw7cEb6OH7b1y_SD-IY1r_gyJtQvdfPgCUpX3PwEuCE3Dxl7TWqTgKhgjwE2EiMmg2olOMJMT7zcdsZnuR4SRUCUfFxtJ18twfgnpACmP0qcNpdPT0n9tAnTJ_gKZExmKYW6PbAkgdcFm/s1600/comment+bubble.png


   Bubble Comment Count, blogger blogspot
https://blogger.googleusercontent.com/img/b/R29vZ2xl/AVvXsEiNXR9S4L4qoam2j3vFnkBvMKhRluIMV0xoREhYvfPfF305-7NdwE9HlTkyV_9Vy4g4MSgGJItvgYBSq_61ynCabTfMguexYvrFqAJpMvbEw9VAfymie0az-Yl8T_h4Z0oFiM-lzHmztGsL/s1600/devil+comment+bubble.png 


https://blogger.googleusercontent.com/img/b/R29vZ2xl/AVvXsEg9Sv5q5t5QMe9d_s862y79psfbyOf7uk9PLcLMVE6APwqkyW6_9B4WUQm5Mh_tLhG-8Nb1lik-F8gneV_z3EnE89MTEU8rEE7YKdmreYelumRpsHCiK5Ifh0C0Ozc3BtnZdCNBRpswnXHv/s1600/funny+comment.png  


https://blogger.googleusercontent.com/img/b/R29vZ2xl/AVvXsEgV1S_8H8B2TpePA6ad_qVeRaWFBtstW5h4wiD5kZ7_QD9DgXmu8B_vNL8X76lYZcuusANWkqJ61MrJ8rh98eJybGgEKZKTSWutYwYaRWUTqgdzR4s4KCcGxqa9Lzk-wKfNHz_bPdFh48VP/s1600/pink+bubble+icon.png


https://blogger.googleusercontent.com/img/b/R29vZ2xl/AVvXsEiG0dJnLTDl0nvT73sr1uwfT5boNIDmIbvr3KLcEN8IATK4MXEMDoVIl1qrrITzNwZv5d3-IyJtPsysFeMxZmhjoN8gaRLzQ_yIm8i06KguwN42tmEJzBmSVIVamy1XoFhTlg3hJwEyFiyk/s1600/speech+bubble+green.png


https://blogger.googleusercontent.com/img/b/R29vZ2xl/AVvXsEgA-p7S2-igZvOi7SBdfjsCe201ZklQpajvbslU0fWy7osUjveOOyRdIDmjOkzqUDgdSl8QexZ6m5tTGiXdoHKsbFLFtvmxGw8cOGDm58yqOeMzkKYbAE-Les115Tv2H4cGXarM3bieG4DC/s1600/bubble+comment.png


https://blogger.googleusercontent.com/img/b/R29vZ2xl/AVvXsEjFAkZxExpdWPztCIr4hoILADaF12V_nvYp-6x-IHeryREk_1_93g9SKWuRJu5KKsA9QzYLApQElmVHtSKI2DBpk0msg9gKhKtNcvyjX9NmBa-0UzJOdkRqUGb1qx99xMZc1Z3gnWyOh5XZ/s1600/comment+bubble2.png


https://blogger.googleusercontent.com/img/b/R29vZ2xl/AVvXsEjdfV6roltYUcMHcgAiJjja_a_UEbSaHMlh1qi0QhlfJeZ5jrQy3Sh8fKT3Gjlv4G9JiKzxz2nsOUWR2MdcjR7OM-3PbSdlosGz9LSG2-h7QY0ZhU-UPBM3QGZBZkE1N36fARiSFKXjWQAg/s1600/comment+bubble3.png


https://blogger.googleusercontent.com/img/b/R29vZ2xl/AVvXsEjx-Rx5zDODtZuhAB6acIeDx8aEh4_ZSDNKI7eD3dCuPksvK0NdyoO70bfk_Ox-4uAoaIGn_6v8p-ju18DFxUSaXdzWkaEJfZwgF9v6cn7HPhVUO1iVnH4fL3AATuY6mc9aT1mJq0XlefXS/s1600/comment+bubble4.png


https://blogger.googleusercontent.com/img/b/R29vZ2xl/AVvXsEiGgQqf5H8jlfVls5nSeeL4_PcCop9Ni0EasNn7i_7BjYuUCgsU8HH7FZQUyjUyUrjXWZXkIb0K7vVlj4Mf5jgJG9OIGzLlUd4HjbxwEQkj3Agm8dMguJm_jnbyf5G6FeSN-vJFrWcZ8MwT/s1600/comment_bubble.png


https://blogger.googleusercontent.com/img/b/R29vZ2xl/AVvXsEh7DLKst-TRUp5YNVwHiw1vv9G7fiM-AhftzQ2W86_F4CU-NzXGxs5sGcney3ScBBPuhAAWwHHkzZrRvP2eezAJDaPeiH-kbCWZvSPCAYsmcf52HEkduDLuX1ABlUokGXSXQDkYZnCzzQ2q/s1600/text_comment_bubble_comments.png


I hope you enjoyed this post.